3d-printable terrain for all your samurai wargaming needs


Probably the most authentically-detailed model so far, the latest addition to the samurai temple collection is officially released today - the new..... er.... old Temple Outer Gate building!
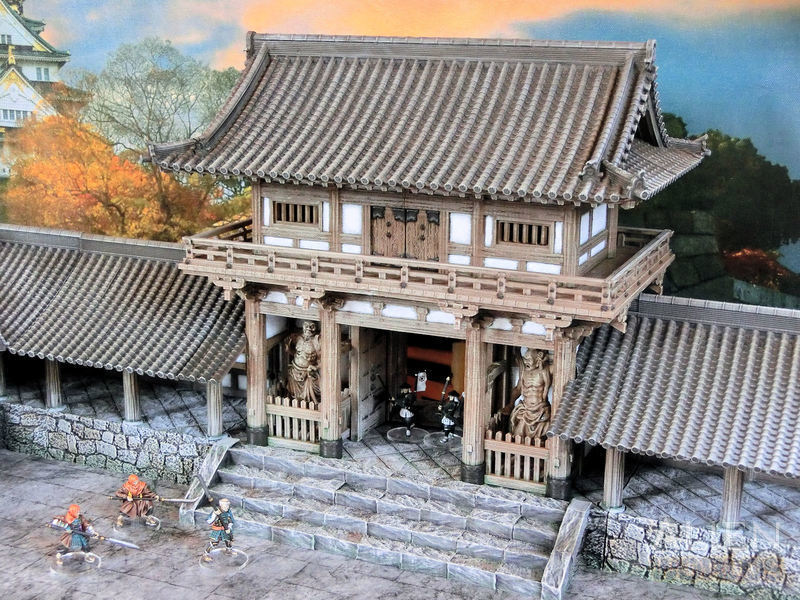
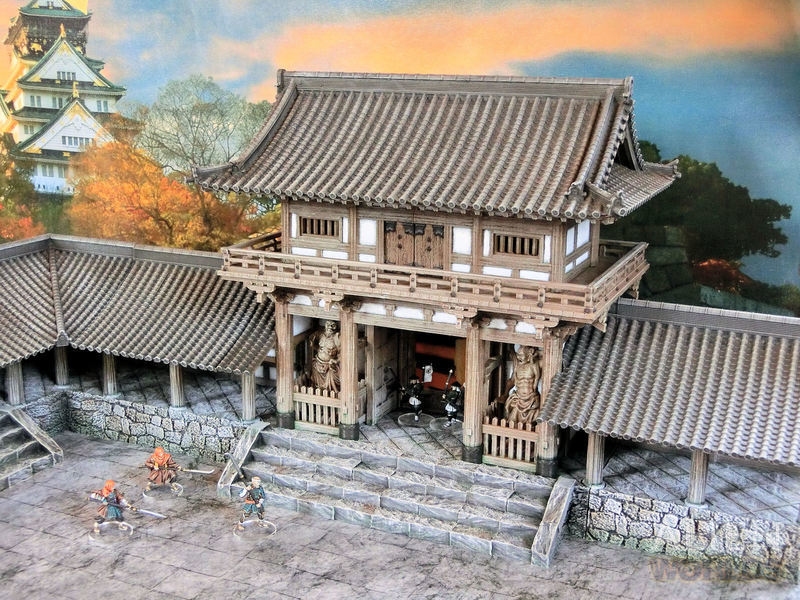
£ The new temple gate building fits perfectly with the surrounding Temple Walls set, and lets you build a complete modular temple area!
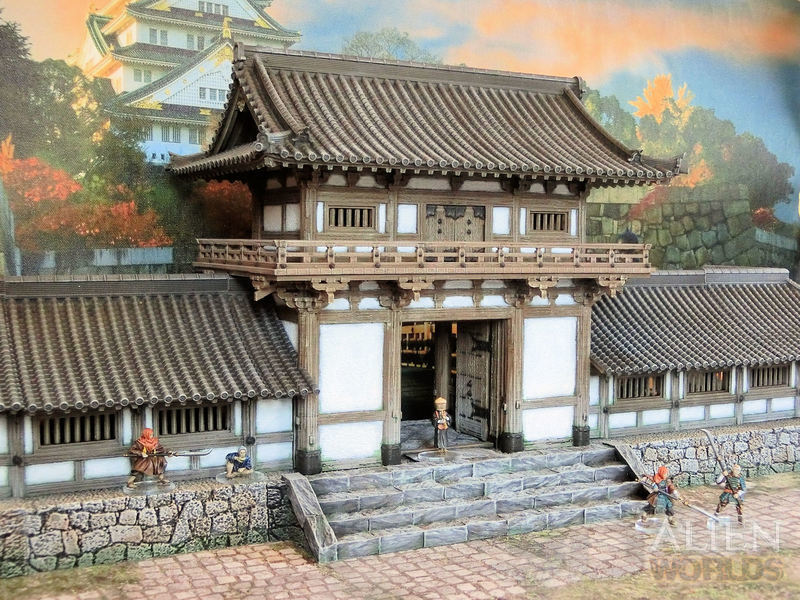
£ The outside of the gate building has these wide steps, which some drunk old dude is using as a resting place while he drinks himself into a stupor. The temple guards are not very pleased to see him!
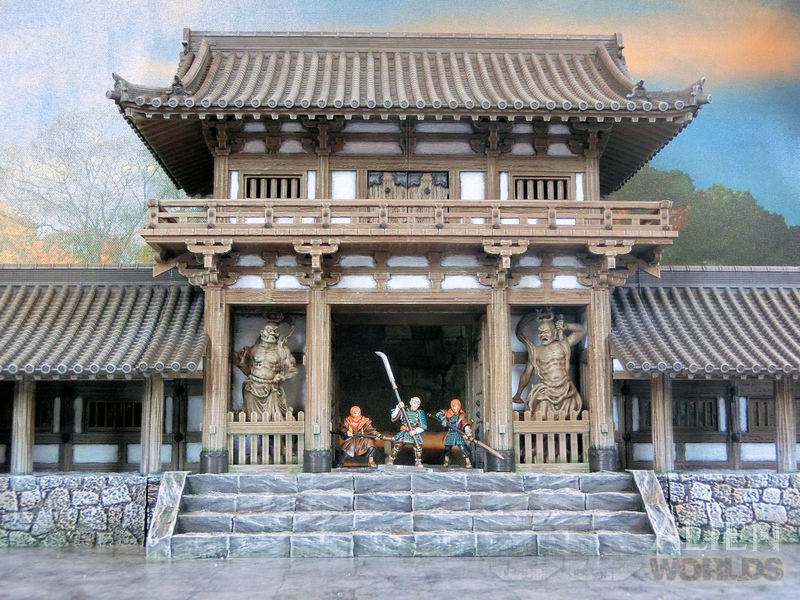
£ The inside of the gate building features these huge deity statues, and you can see how they dwarf the temple guard troops in size. In this photo you can also see the authentic details of the supports under the balcony and roof eaves, and those fantastic curved roofs.
£ Some enemy troops storm into the temple complex, while temple guard sohei spearmen rush to push them out!
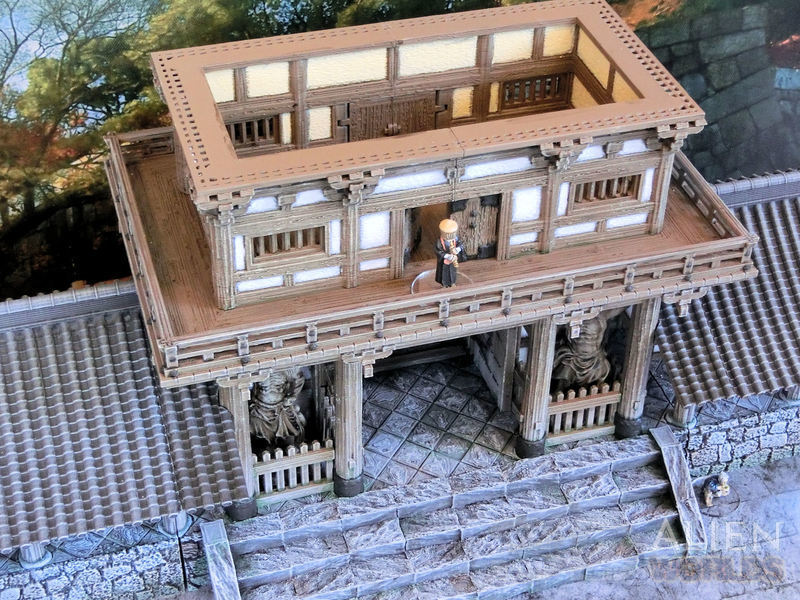
£ The second level is fully playable, with a detailed interior and working doors. Here a priest plays the shakuhachi bamboo flute from the balcony.
Hey, wait! Is that drunk guy back in here AGAIN?!?
I'll have to name him 'Uncle Dave'.
The Samurai Temple Outer Gate is available for download from today!
This is going to be a general guide to choosing a paint scheme for the Temple Outer Gate, rather than a detailed how-to guide. If you're keen to see the details of how this building was painted up, please take a look at the blog about painting the temple walls - this building was completed using the same colour scheme and techniques!

£ When you're choosing a colour scheme for your gate building (and the rest of the temple walls), you traditionally have 2 options to choose from. The first is this fully-painted style, which was perhaps a little more common in urban settings, where more money might be available.
The wall panels tend to be white, with most of the wood painted this eyecatching orangey-red - used for structures in both Buddhism and Shinto religions. If you do an image search for inspiration, you'll see many of them have the ends of wooden beams painted in yellow. The fences around the nio deity statues, and the window bars, are often painted green.
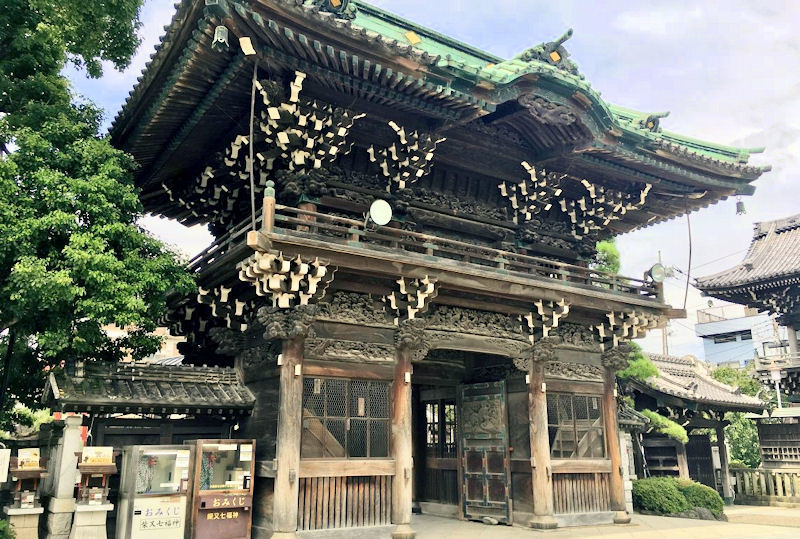
£ Option 2 for your colour scheme is to leave the wood unpainted. This is more common at rural temples, although the one pictured above is actually in Tokyo. The wood tends to be very old, and often darkens with age where it's not so exposed to weather.
If you look at the roof of the building, you'll see it's bright green - which is quite unusual. It's certainly very eye-catching! The ends of beams also seem to be painted white, which looks good against the dark wood... but I'll admit I've never seen that before.
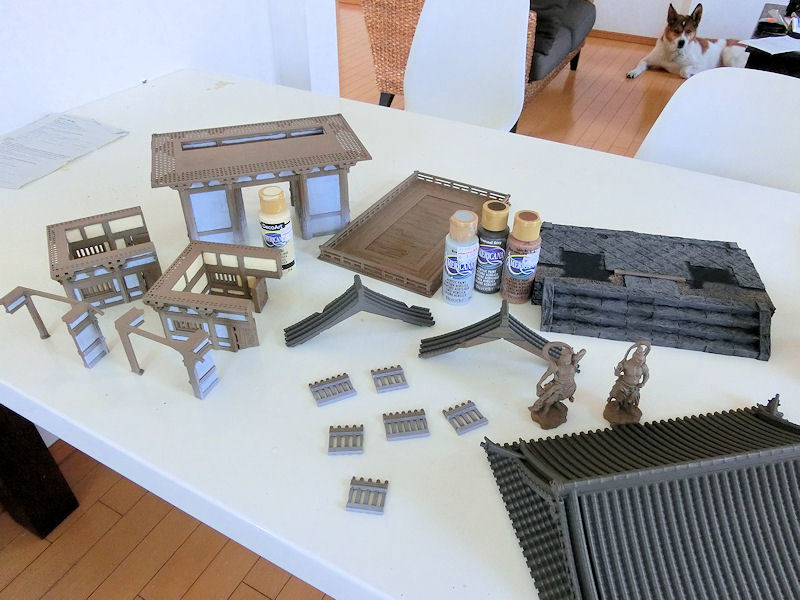
£ I chose to paint my gate building to match the rest of my walls, in light wood with plenty of weathering. I basecoated everything with spray rattlecans in sub-assemblies, as shown in the photo, to make it easier to get a paintbrush into all the nooks and crannies. The photo shows everything ready for washing. After washes, I drybrushed heavily, then glued it together and then finally added brown and green washes to age it.
£ The deity statues can be painted up in a variety of ways. The photo above shows the most gaudy style, where the whole statue is splashed with bright colours and gold leaf.

£ If the fully-painted style is too bright for you, why not try a half-painted approach? Here, only the gold and red really stand out as painted, with perhaps some facial details picked out for eyes and teeth.

£ This last version shows (I assume) a very old statue, where any paint has mostly faded away, and you're left with the wooden statue underneath. Most statues would be wood, of course, but a verdigris copped would also look fantastic, I think!

£ Here's a sneak peek on the colour scheme for my statues. I just chose to leave them as bare wood, with heavy drybrushing. You can also see the light grey drybrushing and green washes around the bases of the pillars, which help to give the old wood a sense of great age.
The outer gate building will be released tomorrow, so watch this space!
Well done on assembling the first level of the Temple Outer Gate building! Today we're going to crack on and finish the rest of this large model, and here are a few tips and tricks to help you....
£ We're going to start with the second level balcony. This can either be printed in 4 quarters and glued together, or printed as one larger piece if your printer bed is large enough.
Once you've printed the balcony, you'll need to carefully remove a few built-in print supports. These supports are at the top of every other post, connecting the middle and top railings (as shown circled in red in the photo above). It's optional to remove these, but I recommend doing so - the railing will look much more authentic!

£ Glue your balcony pieces together, and they should slot neatly onto the joining pegs on the top of the first level. I recommend not gluing the balcony on yet, as it might help you to paint hard-to-reach places later on.

£ The floor for the second level room is simply made up of 4 planked sections, and 1 planked section with a trapdoor. You should be able to fit these neatly into the space in the centre. It makes sense for the trapdoor to go in a back corner, where the steps from ground level would emerge.

£ The second level room is made up of 2 identical pieces, which are printed upside down and do not require supports. Instead, you'll see that each window space has 2 built-in supports (circled in red in the photo above), which should be carefully removed with cutters.

£ Next you'll need to print 4 doors, which slot into the doorframes as shown. I used 1mm brass wire inserted in the holes. Those doors can be reversed, by the way, if you prefer less ornamental styles.

£ TIP: If you cut the wires 2 or 3mm shorter than the top of the holes, then you can close the holes with a spare bit of filament. I found these 1.75mm diameter cut-offs were a perfect fit, with a dab of superglue. They will stop your brass rod falling out when the room is turned over.

£ See? You can smoothly cut the extra filament off smoothly with a sharp knife.

£ Lastly, for this room, you'll need to print 4 of your chosen window type. The normal version has five vertical bars, but a shuttered version and an ornamental version are also included. Just push them in to the window frames from the inside.

£ For now, you might not want to glue the room in place on the second level - it will be much easier to paint the interior separately. I left my two room halves as two separate pieces, for even easier painting.

£ We're almost done now! The last sections to print are the roof pieces, which are printed as 4 quarters for smaller printers, or 2 long half pieces for those with longer print beds. None of these require print supports.
If you look closely at the corner of each piece, however, you can see there is a tiny built-in print support holding up the tip of the decorative tile. You can carefully remove this with a sharp knife or cutters, or leave it in place if you prefer.
So, your model is now complete!!! Congratulations!
It's time for some finished pics.......

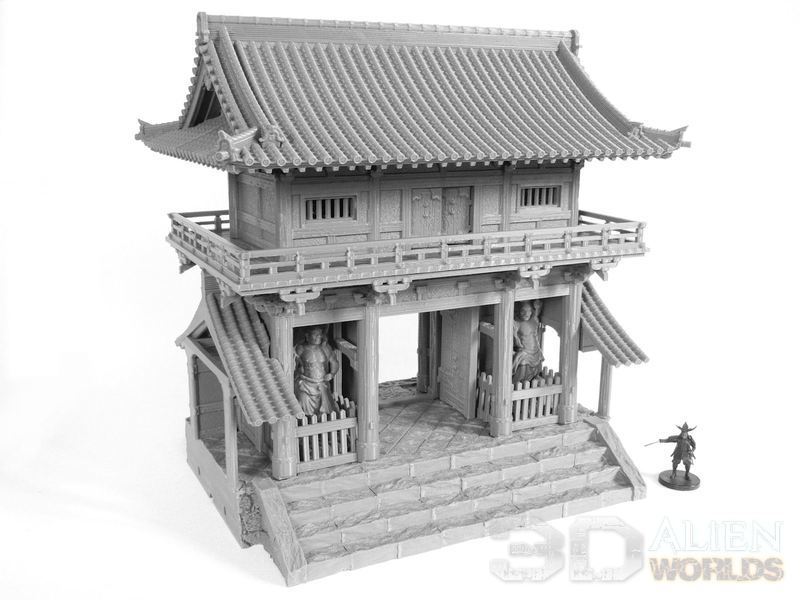
£ Fully assembled, it's a pretty big building! With the base section, it's 240mm wide (270mm wide at the roof) and 270mm (11") tall!

£ With those large gates closed tight, the front of the building is pretty imposing.

£ From this model's eye view of the back (the 'inside' of the temple), you can see the intricate supports underneath the balcony and the roof.

£ Even without the base section, you can see how impressive the gate building and its deity statues look!

£ You can even leave off the side roof sections, and use this as a stand-along building if you prefer.
* There will be more stand-alone temple buildings coming soon, by the way!

£ This is the front view of the stand-alone version of this building, without the base section.
This large model will be hitting the paint desk today, and should be released very shortly!
The upcoming Temple Outer Gate building is quite a large model, so we're going to split the build instructions into 2 blog posts. Thankfully it's not quite as scary as assembling the 5-level castle, though!!
Here's the first half of the build - a guide on how to print and assemble the first level of this two-storey building.....
For reference, all these pieces were printed at 0.2mm layers, with 5% infill, on an FDM printer. Apart from the statues, NO print supports are required for any of these parts.
£ All the parts for this temple outer gate building can be printed on a 125mm² printer bed, but if you're lucky enough to have a larger print bed you can choose to print the combined pieces instead (also included in the download set).
The base section for the gate building is 240mm wide in total, and I printed this in one piece.

£ Next you'll need to print the main sections of the first level, all upside down. There are 4 of these, but again I was able to print the combined model.
Please note that there are 2 built-in print supports on the model (circled in red in the above photo, holding up two thick beams), and these should be removed during assembly, as shown.

£ This is what the main section looks like when assembled. There are also 4 tiny joining pieces glued on the top - one in each corner. These are helpful in lining up this level with the next level correctly, but they are not essential.

£ You could use this gate building as a stand alone building without the base section or adjoining pieces if you prefer, but if you are using the base section, then you will need to print these small side pieces. They connect with other straight or corner pieces from the Temple Walls set.
As usual, these do not require print supports either!

£ This is how those two side pieces look attached to the main building. I would advise you not to glue them on just yet, as it will be much easier to paint as separate pieces.

£ Next you'll need to print the two massive gates and the two matching hinge posts. Turn the building upside down, carefully slot a gate into the top hinge (which is at the bottom of the photo, because it's upside down!), and then you can gently push the hinge post into the slot to attach the gate firmly.
These can be swung opened or closed during gameplay, or you could glue them permanently open if you prefer.

£ The last step for the lower level is to print the two sets of fences, for the statue bays.
I recommend you don't glue these in place yet, as it will be much easier to paint the bays without the fences attached. Also, please remember that the posts fit into the 1mm-deep slots on the base, so your fences will probably be about 1mm higher than the bottom level of the posts - so please glue the fences after you've attached the base!
Part two of the build, and some completed model photos, coming in the next blog!
One of the unique features of the new Temple Outer Gate is the pair of deity statues either side of the gateway.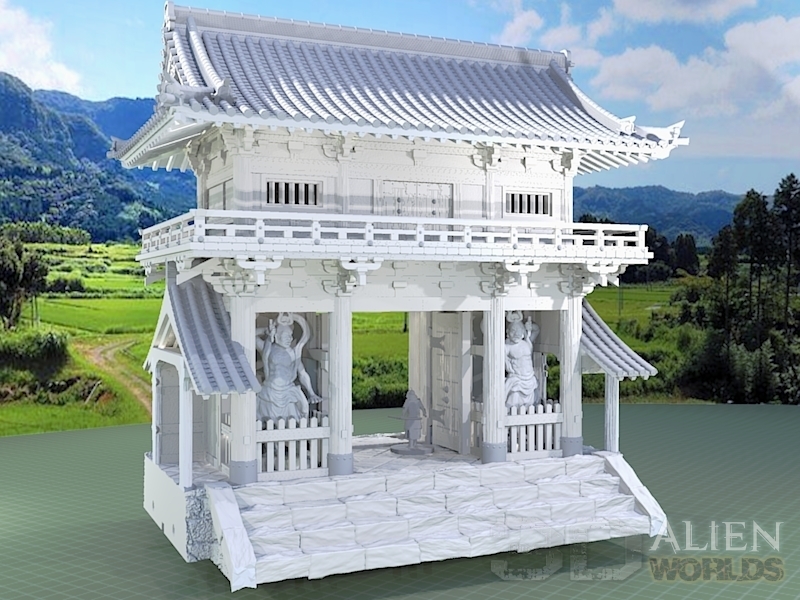
£ Both statues are quite large, standing about 80mm tall from base to top.
The first time I tried printing these statues I set Cura to use "tree-supports" to support the bottoms of their tunics and hands and elbows. Unfortunately I'd never used tree supports before and both statues failed about 2~3cm up. I obviously didn't have the settings quite right, and eventually some of the finer parts snapped off and got the rest of the print tangled up.
Failure! 😭
So, rather than tweak settings again and again until the statues printed properly, I decided to edit the statues to create a second set of pre-supported statues, which even the most clumsy of FDM printers (me included!) could print without too much difficulty. Both versions (supported and unsupported) are included in the download.

£ These are the pre-supported versions of the statues. You'll see that there are a number of 3mm-wide green posts added around the hem of the tunics, and a couple more holding up hands and elbows. These are the built in supports, and meant that I was able to print both statues without any other Cura-added supports at all!
Success! 😊
I printed the first statue at 0.2mm layer height, just to check it worked, and printed the other statue at 0.1mm layers. To be honest, there was not much difference between the finished statues (you can compare them below) - the main differences being the smoothing of shallow curved surfaces like tops of feet and heads.
I would also recommend slowing down your printer for these statues - I halved my normal 40mm/s speed (that I usually use for all terrain), down to 20mm/s. The infill was still only 5%.

£ Once you've got your models printed, you can burn off any wispy strands with a quick pass of a lighter, and then you'll need to carefully remove the built-in print supports.
Here's how I did that...
You could simply snip them off with cutters, but I find that sometimes the thickness of the cutters will force the two sides apart and crack the model along the layer lines. Since these were pretty delicate pieces, I decided to first saw through each of the print supports with a fine-toothed saw blade, as shown in the photo above. In addition to separating both sides, it gives you a spare 1mm of movement, which helps later when you're snipping off supports.
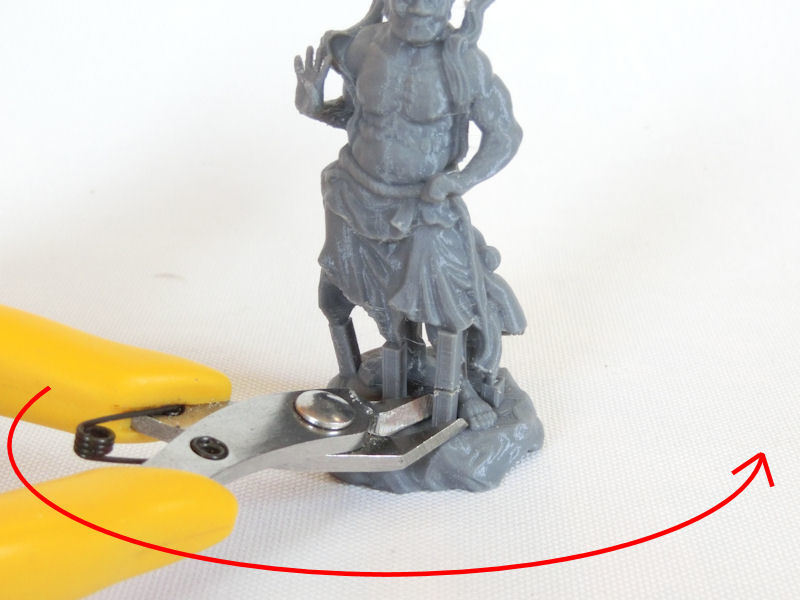
£ Next, gently grasp the end of a print support between the ends of your cutters, and rotate the cutters around the support post (as shown by the red arrow in the picture above). Just spin the cutters back and forth in a semi-circle, while squeezing gently on the handles.
After a few passes, the cutters should grind/cut through the support, and you can remove it without damaging the model.

£ The last picture to show you today is this photo of the two statues. The one on the left was printed at 0.1mm layers, and the one on the right at 0.2mm layers. If you look very closely, you can see the layer lines on the top of the feet, on the statue on the right. The rock was also a bit rougher.
Next blog I'll be showing off the assembly of the gate building itself, so watch this space!


0 Comments :
Write a comment :