3d-printable terrain for all your samurai wargaming needs


Printing is now complete on the 3rd of our Tau-themed sci-fi terrain models - the Taui Fusion Reactor!
Assembly is pretty simple, but here are some tips and suggestions for getting the most out of this large terrain piece.....
£ The base can be printed as one piece for those that have large enough printers (25cm² bed), or as 4 separate pieces which all fit on to a smaller 12.5cm² print bed.

£ Next you'll need two side towers. These fit neatly at each end.

£ Next come the big pieces! To print these as one piece prints, you'll need 27cm of available print height, but of course smaller cut versions have also been included.
I printed every piece of this model at 100% infill, because I'm using clear filament for LEDs. The walls are only 2mm thick, so printing at 100% infill doesn't make much difference to the amount of filament used.

£ The final two pieces are the computer terminal and the central reactor core. These are the only pieces that require print supports, and should be printed as oriented in the files if possible.

£ Here's the finished and assembled model, which towers 27cm (11") high. It is 30cm x 16cm (12" x 6.5") large at the base. It's hard to see the sculpted detail with this clear blue filament, but there are some lines and alien text dotted around the model. These will be much clearer on the painted version!

£ One unusual feature of this design is that it's hollow! Every piece, from the big towers, to the small monitor terminal and reactor core, is designed for LEDs and wiring to be inserted if you want to. It's not essential to do that, of course, but I thought it was fun to give you that option.

£ A quick test of some string LEDs pushed through the central reactor core. Those holes are 5mm in diameter, by the way, which should allow most small LEDs to fit.

£ How big is it? Pretty big!
It's larger even than this Eldar wraithknight model, and has space for maybe 20 infantry models behind the walls, so should provide decent cover options for your tables.
The fusion reactor will be hitting the paint desk this week, and should be released very soon (along with another Taui design!). Watch this space.....
We have a new design for our Taui sci-fi range to show to you today - the rather large Fusion Reactor!
In keeping with the existing style of the Landing Pad and Teleporter, this design has similar rounded surfaces and a clean sci-fi look. It measures a whopping 303mm x 160mm table footprint (12" x 6½"), with a height of 270mm (11"). 
This hollow terrain piece has been designed with clear PLA filaments in mind. By printing in your choice of clear or colour-tinted 3D printer filament, you can easily add lighting effects with clusters of LED lights inside the reactors and the surrounding walls. The hollow reactor core also features 5mm holes, and can be wired for LEDs.
It's test printing at the moment, so some printed photos will be coming in a few days!
We have a new print partner to announce this week, PRINT A QUEST, from Queensland, Australia. They are now selling print versions of our Japanese samurai terrain, and Necrontyr and Eldari sci-fi terrain on their webstore! They even have a free shipping offer on at the moment!

The first new release of 2021 for you today - some wooden Samurai Pavises!
Wooden pavises, or tate, were used by feudal-era infantry as protective shields from enemy arrows. They were large enough for one or two soldiers to take shelter behind, and were used by archers and ashigaru alike. The stand at the rear could be planted in the ground to create a stable barrier, or it could be carried in one hand.

£ This set contains 12 versions with clan markings, 1 blank version, and 1 version with double horizontal stripes at the top. All have detailed woodgrain textures on both sides, which is more pronounced at the top and bottom.

£ Wooden pavises were also hung over castle walls, to provide extra cover for troops within.
Although I suspect pavises would be placed slightly lower on the walls than in this photo (perhaps only half protruding above the top of the wall?), but they are easy enough to temporarily balance on the walls for a quick game!
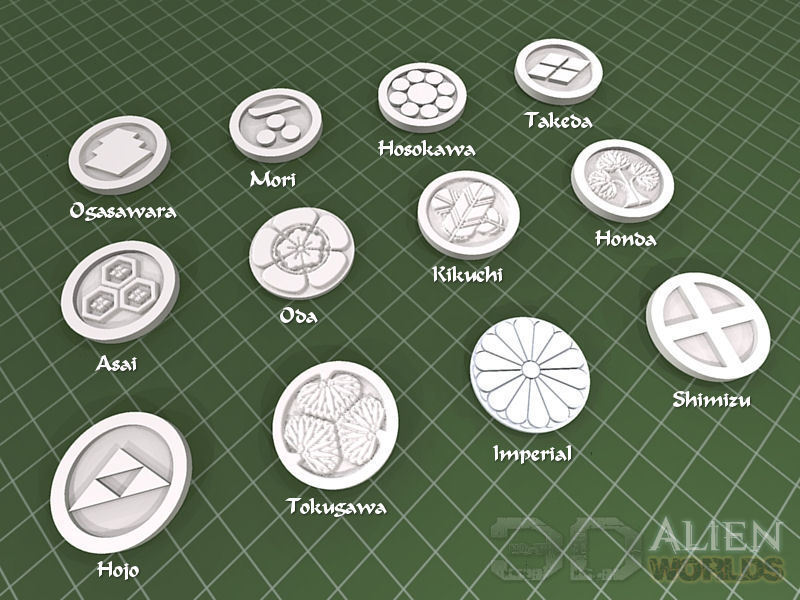
£ These are the 12 clan symbols marked on the pavises. 5 of them (the more intricate ones) are projecting from the wood, and the rest are carved into the wood.

£ The sculpted wood patterns make these very quick to paint. I used a light brown spray undercoat, with a brown wash on top of that to produce the photo above. A drybrush with lightbrown and then a very light drybrush with sand-coloured paint gave them a great weathered finish. The nailheads are picked out in dark grey.
The carved clan symbols are particularly easy to paint - I just used a black wash nudged into the carved shapes, and the wash flows into the right bits.

£ In this old illustration, you can see that you could also paint the pavises in a much lighter colour (or clan colours etc), to show freshly cut wood or painted designs.

The wooden Samurai Pavises are available for download from today!
Something new to show you today - wooden pavises for our samurai range!

£ Wooden pavises, or tate, were used by feudal-era infantry as protective shields from enemy arrows. They were large enough for one or two soldiers to take shelter behind, and were used by archers and ashigaru alike. The stand at the rear could be planted in the ground to create a stable barrier, or it could be carried in one hand.

£ These pavises measure 21mm wide by 34mm tall, and are printed in two parts. They feature detailed woodgrain textures and stud fixings on the front. The woodgrain has been modelled to be slightly more pronounced at the top and bottom.

£ The set contains the 12 clan crest versions (on the right), a blank version and another version with two thin horizontal stripes (on the left).

£ If you're in a hurry to print dozens of them, a 0.2mm layer resolution will produce a good result. But for models this small, I prefer to print at 0.1mm layer resolution.

£ The files can be printed on their sides, like this, with no supports. I recommend printing with a brim to stop them toppling over on the printbed.

£ The pavise legs are separate pieces, and can also be printed without supports. Again, I recommend printing with a brim, as in the photo above.

£ 5 of the 12 clan symbols are very, very intricate, and proved difficult to cut into the pavise. As you can see from the photo above, the engraved versions (on the left) didn't print very cleanly on my FDM printer, so for those 5 clans I decided to emboss the symbols instead (shown on the right).
These should be very quick paintjobs, so the pavise set will be officially released in a few days! Watch this space....


2 Comments :
Troy Lanning
2021-02-08 (Mon) 11:08AM
so excited for this!
2021-02-08 (Mon) 11:12AM
Hi Troy! Awesome to hear - and you're gonna love the next annnouncement too! More Taui, more GUNSSSSS!
Write a comment :