3d-printable terrain for all your samurai wargaming needs


This came up in a recent game of Test of Honour - how to mark out the area around an objective, so that it's easier to see if enemy are in range to contest it. So today we have a little gaming aid to present to you..... Objective Rings!

▲ These model are a set of variously-sized marker ropes, themed to fit into any samurai game. Each ring is a 3d-printable double rope, with a decorative paper tassle placed at one point of the ring.
For anybody also interested in those treasure chest objectives, by the way, they are available for free on Thingiverse (author unknown, sorry!).

▲ There are 5 different sizes of objective ring included in the set:
Please note that the 8" and 6" diameter circles will require larger print beds, to print in one piece.
The Objective Rings are available for download from today!
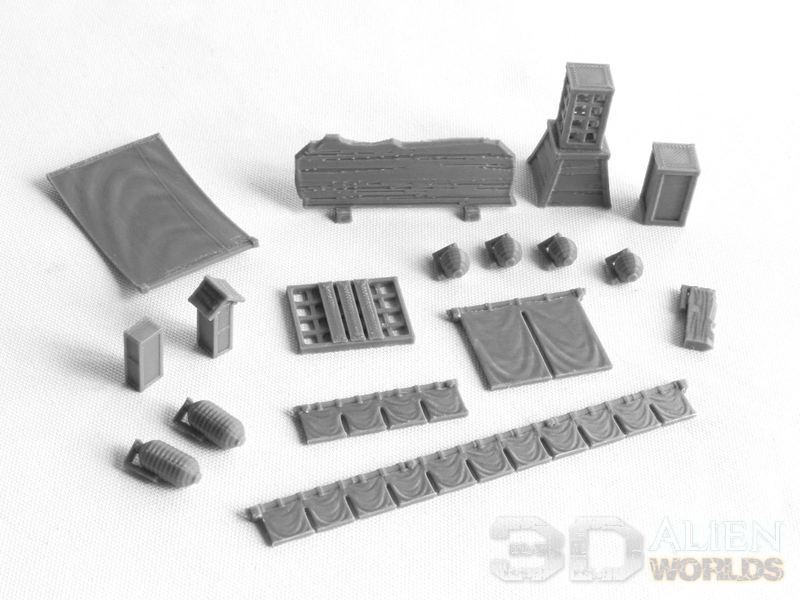
Lots and LOTS of photos to show you today, with assembled pics of the 8 shops from the upcoming Samurai Shop Set!
▲ These are all the accessories I printed out for my 8 shops, enough to fill out all the interiors and several exteriors, too! I printed some of the bigger accessories (e.g. tables and shelves) at 0.2mm layers, and the smaller items at 0.1mm layers. Some of them (the musical instruments, for example) are quite tiny indeed, and will benefit from thin layers and a slower print speed.
All of these items can be printed support-free.
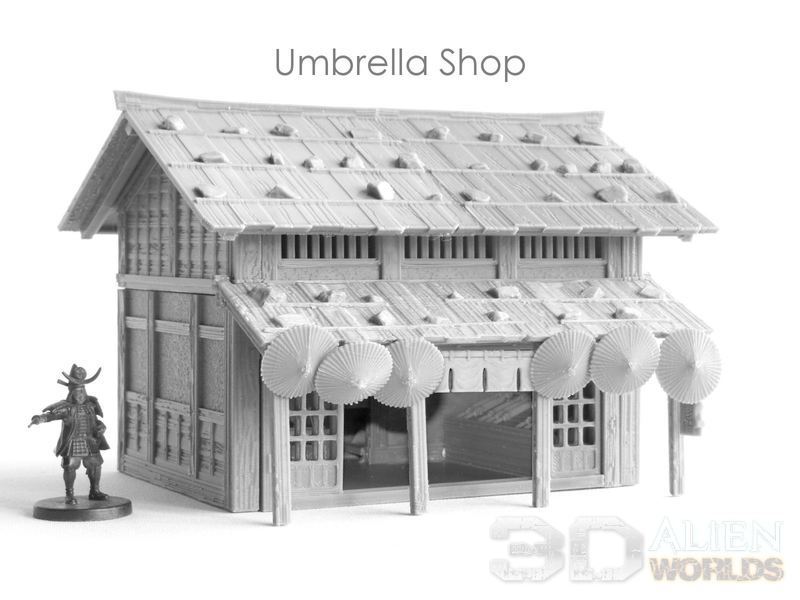
▲ Shop #1 is the UMBRELLA shop. It's all about the paper umbrellas, of course, and these are printed in 2 halves, with a thin stick inserted as the handle. I found they looked good hanging off the front of the shop.... 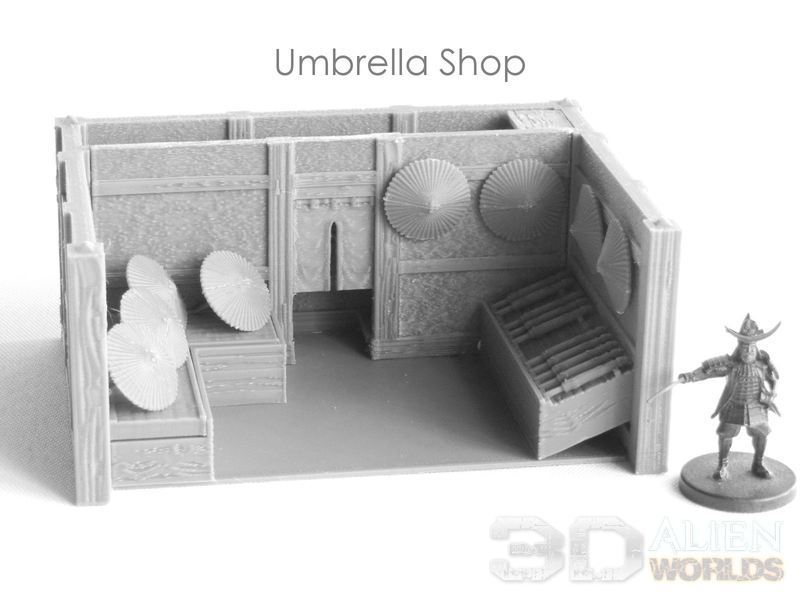
▲ ... and carefully displayed on the interior walls and on raised tatami benches. There is also a display cabinet of folded umbrellas on the right, which is printed flat but should be glued at an angle, as shown in the photo above.
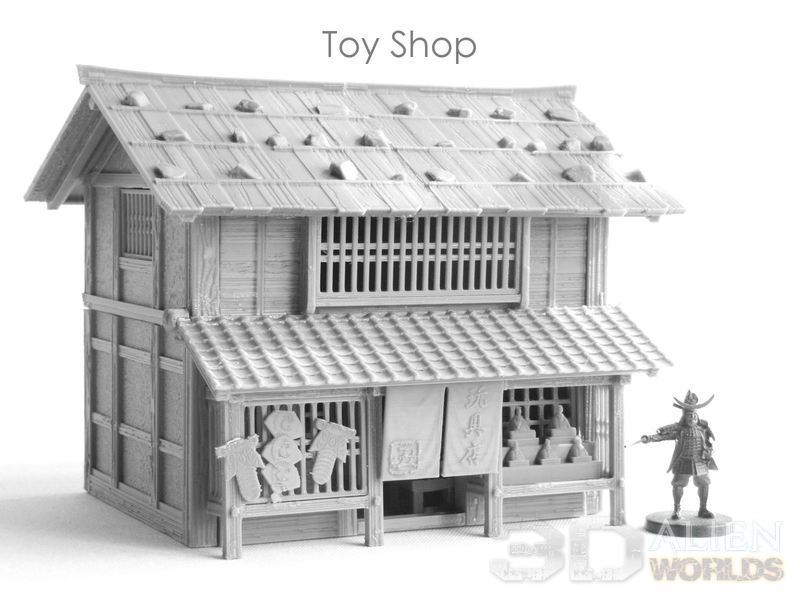
▲ The TOY shop is shop #2, and I modelled it with display windows at the front. I glued kites to the display on the left, and the tiny, tiny doll display in the window on the right. You can choose whether to cover the front with a wooden grill, or leave the display open. There is also a customised noren curtain at the entrance of the shop.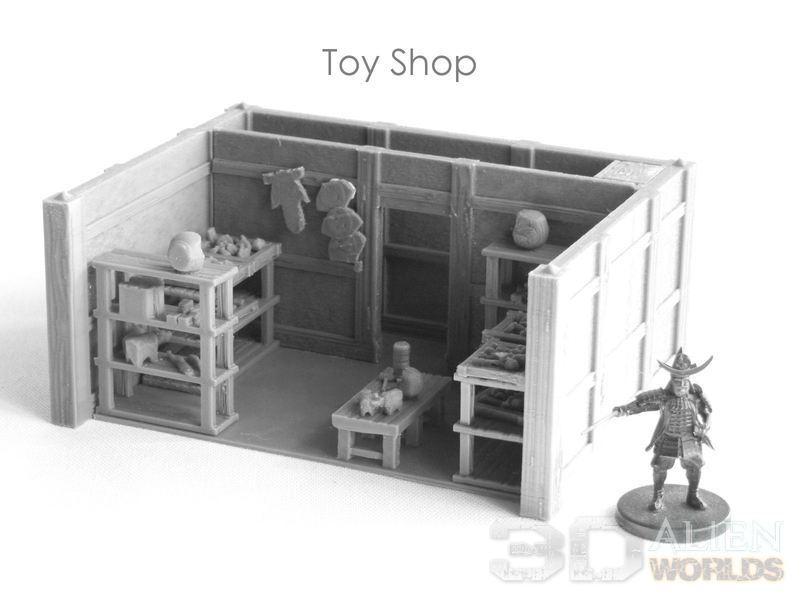
▲ Inside would typically be a colourful assortment of traditional wooden and bamboo toys. There are one-piece toy shelves covered in wooden animals and fat daruma dolls, empty shelves which can be stocked with trays of toys, and a table with some wooden games.

▲ Shop #3 is the POTTERY shop, which is pretty basic. It has a customised noren curtain at the door, and a couple of low tables of vases outside.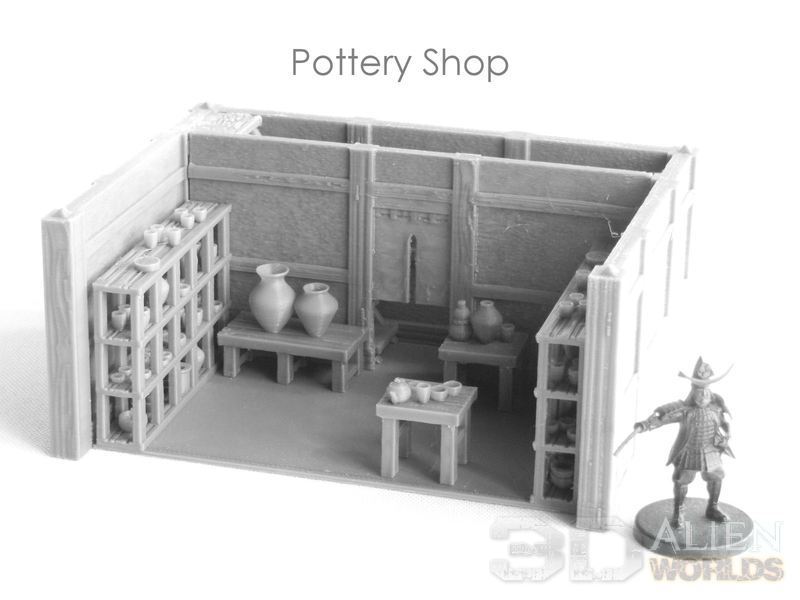
▲ Inside are large shelves stacked with various dishes, bowls, vases and pots. These are all one-piece print items.

▲ The CLOTH shop is one of the fancier shops in the set. The exterior of the store has a large wooden sign on the front roof, and some discreet display windows full of cloth stands.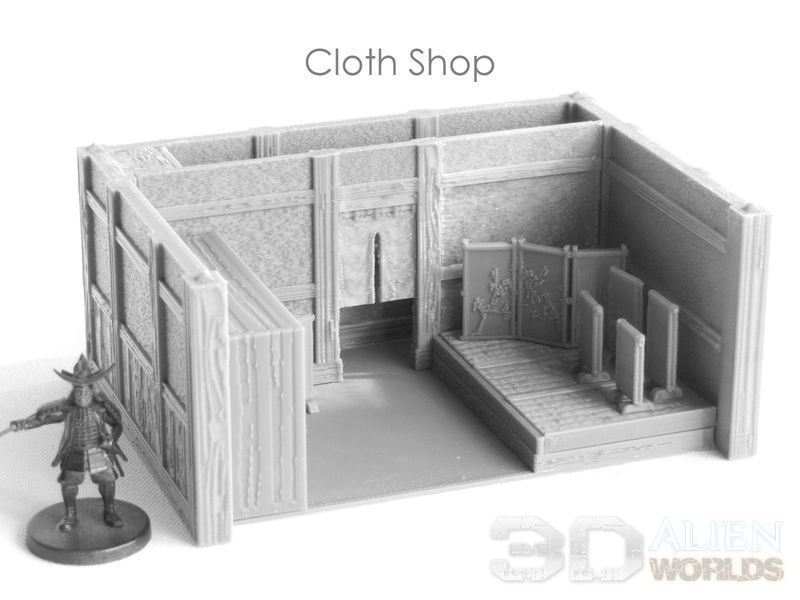
▲ The interior, on the other hand, is quite elegant and very detailed. On the right we have a raised tatami area where customers would stand to be fitted and measured. Several stands of cloth (I printed some of them at a taller 120% height for variation) are displayed, and an ornate paper screen allows customers to change.
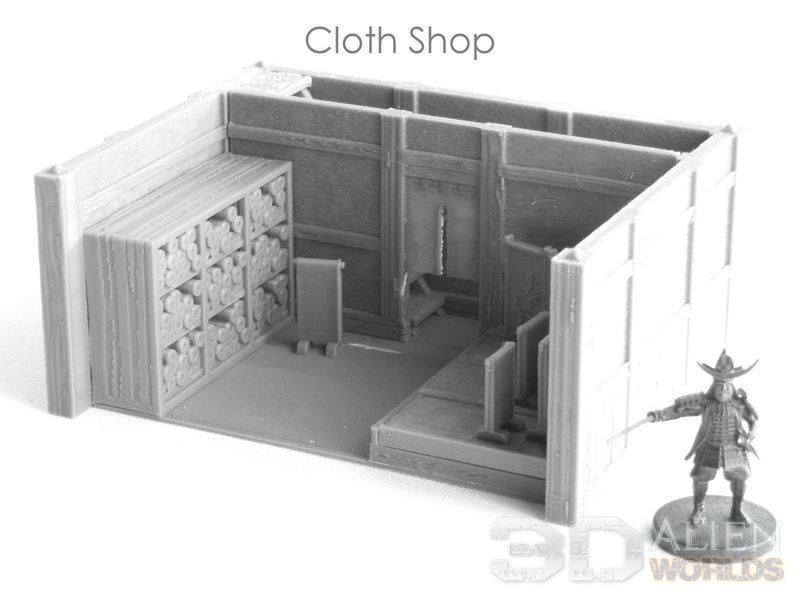
▲ On the other side of the shops are hundreds of rolls of cloth, which will look great in a wide variety of colours. The stands of cloth would typically be draped in very gorgeous kimono fabrics.

▲ Shop #5 has some awesome accessories - the RICE shop! The exterior is usually nothing fancy, but we have a large tub of rice on a bench on the left, a customised noren curtain over the door (and another smaller sign on the post on the right), and a brilliant rice-cleaning machine, too. I'll show off a picture of the real-life machine in the next blog article!
▲ The interior has, of course, a huge stack of rice bails on one side, and on the other is another large tub of rice, and a rice-pounding machine. This machine comes in a few parts, and should be glued together as shown. It's very simple to operate - you put rice in the stone bowl, and then raise and drop the heavy wooden beam using the handle on top.

▲ I think shop #6 is going to feature as a game objective in many of your wargames - it's the sake (rice-wine) shop! Traditionally, sake (rice-wine) is a better quality and more expensive alcohol, but you'll also find cheaper shochu (potato-wine) in any store. The outside of this shop has a single sake barrel and a large customised fabric screen on the right, two large paper lanterns by the doorway, and a traditional tub-and-bucket display and another smaller sign on the post on the left.
▲ The interior has a giant vat and ladle, a stack of sake barrels and basic barrels on benches, and a shelf and low table full of wooden cups and bottles. It's definitely party time!
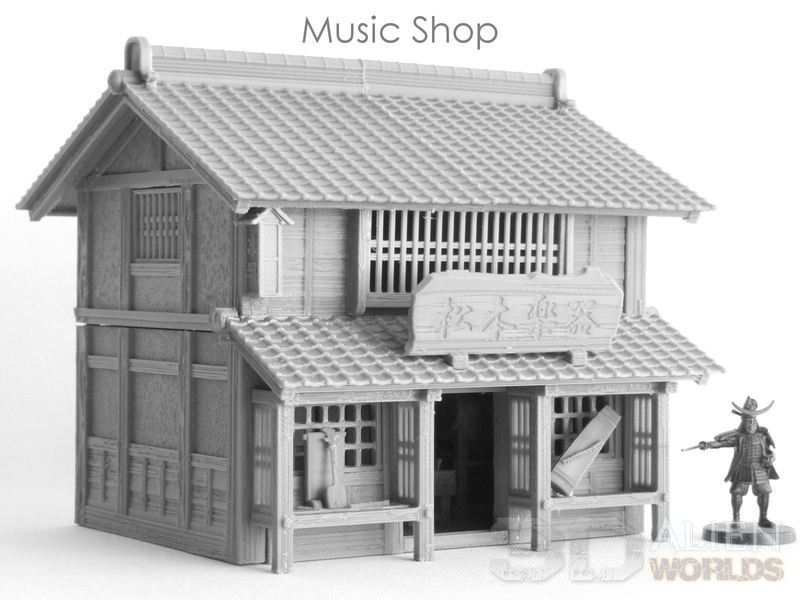
▲ There are only two more shops to go now, but these are probably my favourites. #7 is the MUSIC shop, with various traditional musical instruments on display. I might leave the front window display boxes open, so players can view the shamisen (3-string banjo?) and large koto easily? There's also a large wooden sign on the roof, and a smaller paper sign on the left next to it.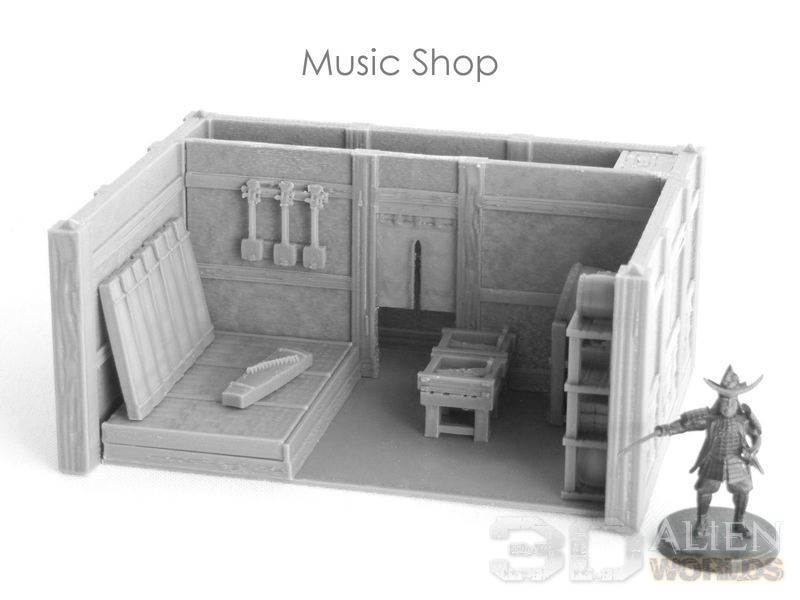
▲ The interior has some lovely details, with bamboo flutes on boxes on shelves, several sizes of drums, and shamisen and koto instruments on the raised tatami playing area on the left.
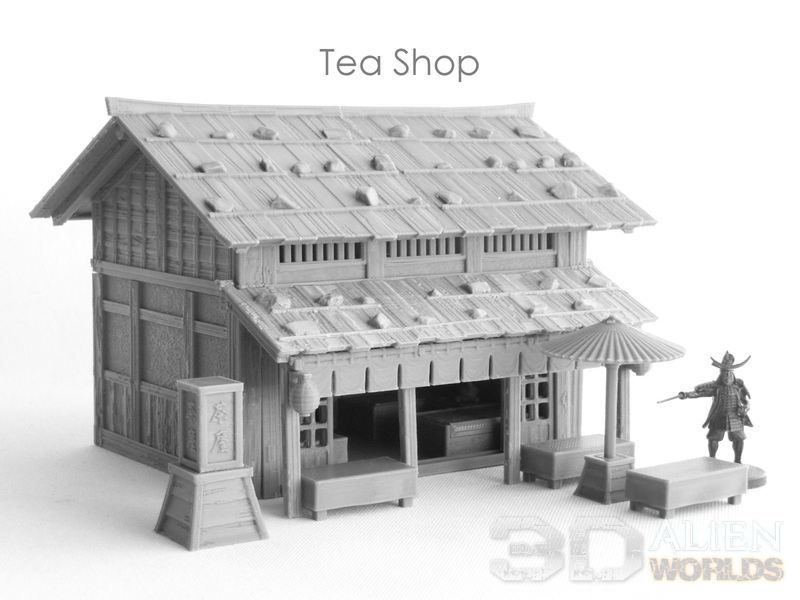
▲ Finally we come to shop #8, the last of the set. This is the TEA shop, which has plenty of outdoor seating in front. I've used a long noren curtain right the way across, two small paper lanterns on the posts, and cloth-covered benches underneath the large paper umbrella.
On the left we also have a customised top for the new LED shop sign, which says 'tea shop'. Sadly, I didn't have any white filament available (which works better with LEDs), so I will probably just paint that as solid, but another version can also be fitted with thin paper if you want to light it with an LED bulb. This new lantern is considerably shorter than the previous wooden LED lantern, by the way, because it uses a smaller CR1632 battery.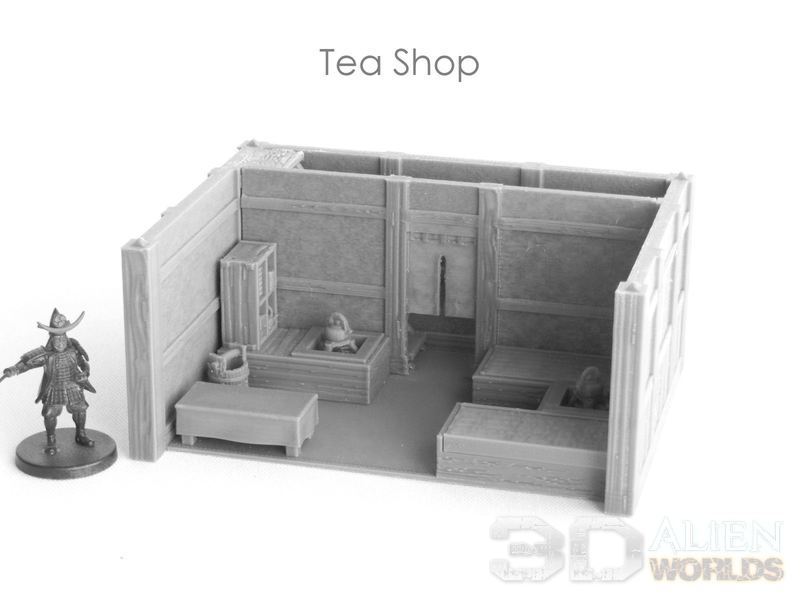
▲ The interior of the tea shop has a mix of cloth-covered benches and larger tatami seating, with two kettle firepits and a small shelf and water bucket.
Phew! We're done! That's all 8 of the new shops! Just think, if 8 shops are still not enough for you, you can also mix in the accessories from the 10 market stalls for even more!!
These shops are currently on the paint desk, and will be released next week! Watch this space...
The new Samurai Shop set has so many possible model combinations, we're going to split the assembly blog into 2 parts.
So today's blog will focus on constructing the shop buildings, and part 2 will show off the 8 shops of accessories. Ready? Let's get started.....
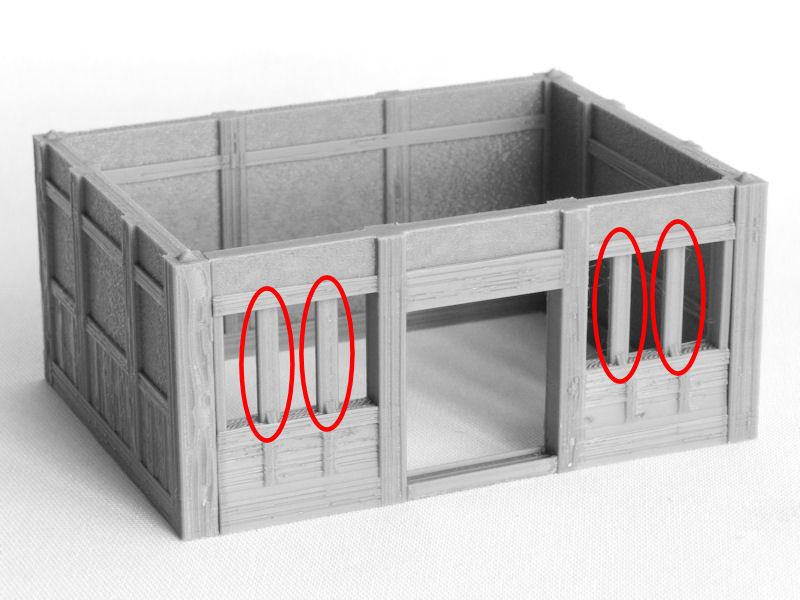
▲ We start the construction process by printing the side and back walls, and then the front wall. Every piece of these shops is designed to print without supports, to make your life easier!
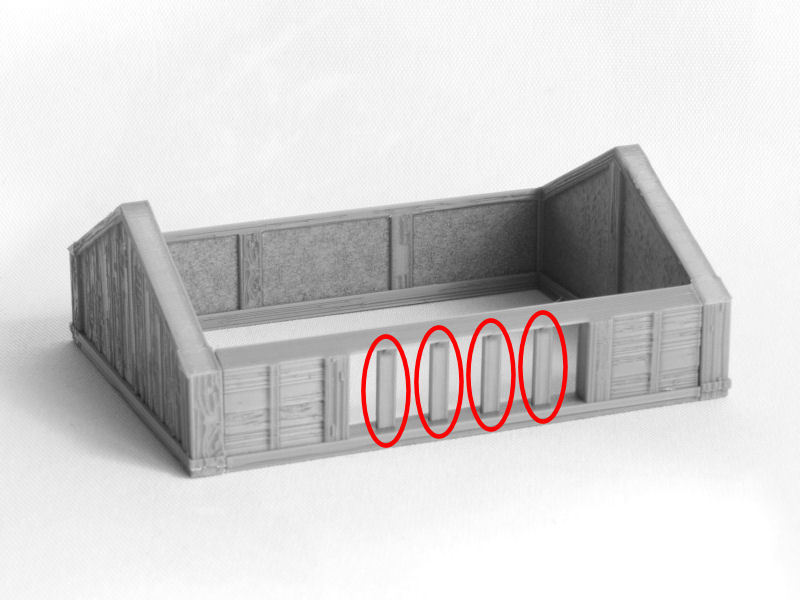
There are, however, a few built-in print supports in the window frames (circled in red in the photo above), which will need to be removed before assembly.

▲ To remove the print supports, I've found that the best method is to slowly squeeze at top and bottom of each support, while also twisting the cutters gently from side to side. Once the supports are removed, you can stick in the window grills.

▲ There are 3 basic patterns of wall texture, as shown in the photo above. The model on the left has vertical wood planks on its lower walls, the model in the middle has horizontal wooden slats, and the version on the right has textured earth walls for all panels.
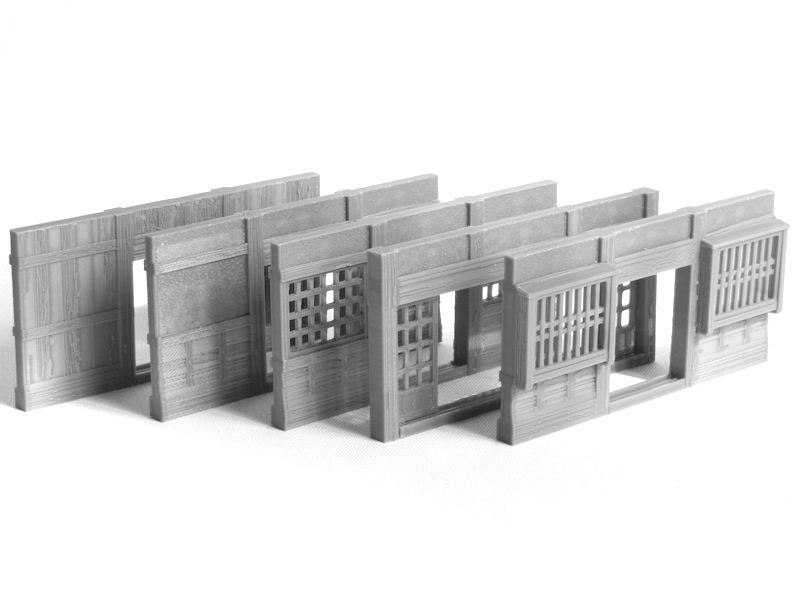
▲ For the front wall of the shop, you have a choice of 5 wall types. From the left, we have:
All of these walls feature sliding doors to enter the shop.

▲ In addition to those 5 front wall types, there is also an optional display window case, which can be attached to the first three wall types (so not the sliding door wall or the projecting box window wall).
There are four small built-in print supports (circled in red in the photo above), which should be removed before assembly.
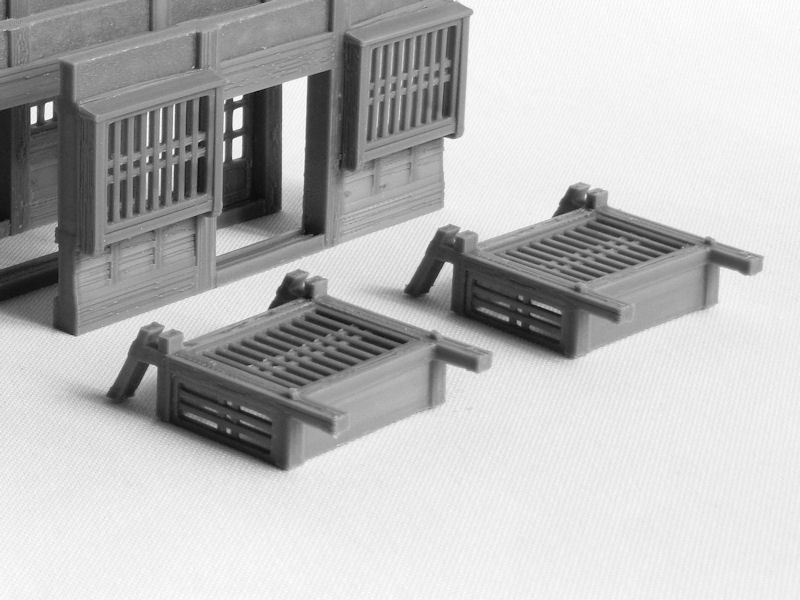
▲ I've printed two of the display window boxes, to use on my fancier shops.
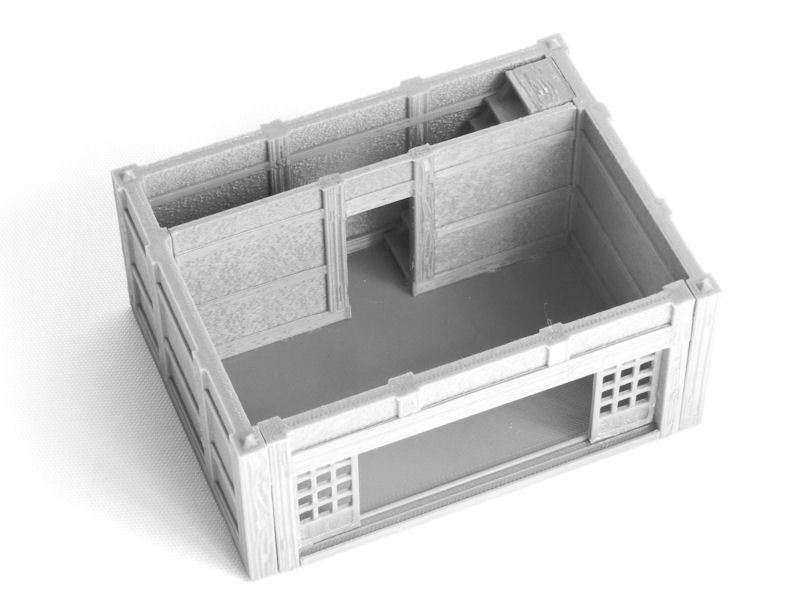
▲ Once you've printed the surrounding walls, you should print the floor section, the inner wall, and the stairs. There are two versions of the inner wall - with and without a small dividing curtain.
If you're thinking that those stairs are narrow, you're quite right - they are tiny! They're not really intended to be used by customers, so shop-owners tend to cram them in to the smallest possible space.
TIP: To make painting easier, DON'T glue the floor and inner wall into the model yet.
▲ Now we move on to the second storey. You've got several choices for wall types, and more choices for the front wall, too. You can also choose to model your shop with a low second storey (usually just for storage), or with a tall second storey (for a complete room).
Again, some of the wall sections include built-in print supports (circled in red in the photo above) for windows, which should be removed before assembly.
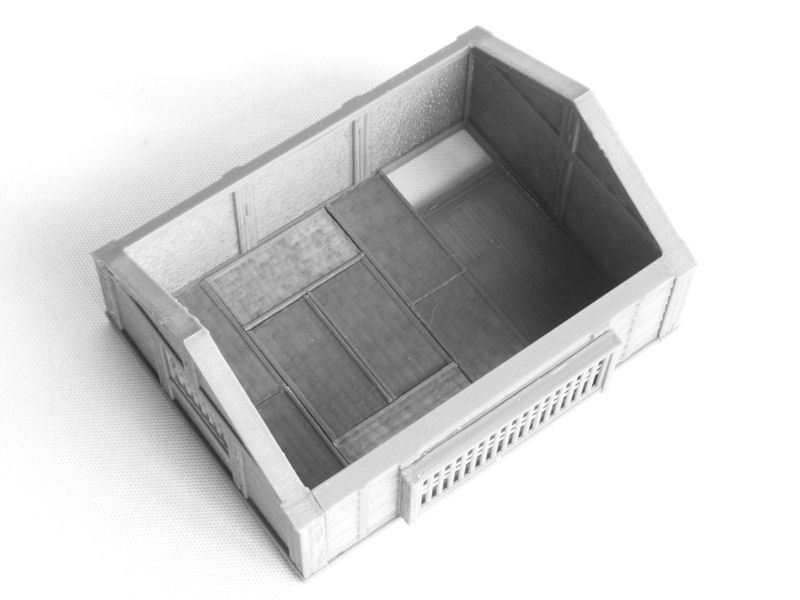
▲ After you've glued your second storey walls together, you should print the small wooden floor piece that goes next to the steps, and then the main floor. In the photo above you can see I've chosen to decorate this taller room with 8 tatami mats for the main floor, but for lower-height rooms you would probably just want to print the wooden floor version instead.
NOTE: The interior is reversible, in case you want to model the stairs to the left, instead of the right.
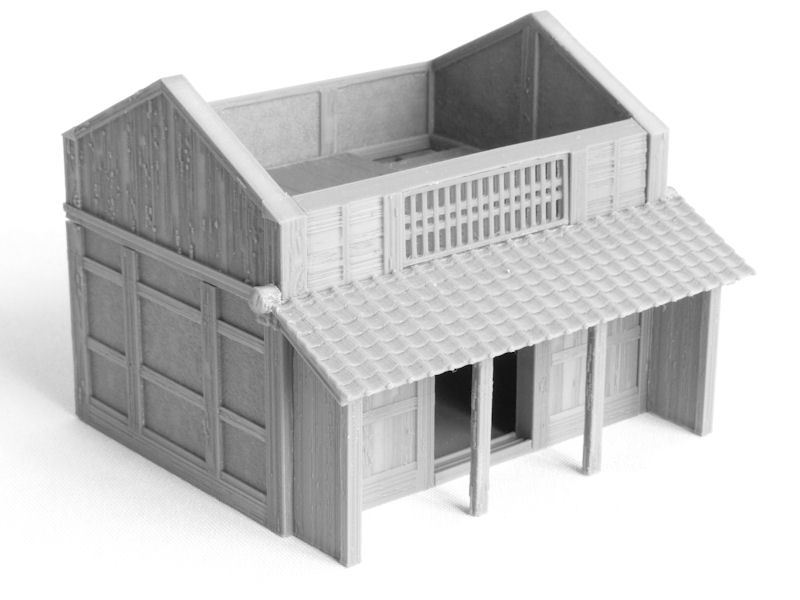
▲ Japanese shops usually have a short roof at the front of the store, to protect customers from the weather and also to create a grander shop front. There are two versions of this front roof included in the set - a wooden plank version (with rocks to protect it from typhoons), and the tiled version shown in the photo above.
The front roof glues to the bottom edge of the second storey, and can be supported by 2 or 4 vertical posts. The picture above shows another option, with a solid wood wall at each end instead of the thinner posts.
NOTE: If you're using the display window boxes, you won't need to add these posts.
▲ And here it is, a finished shop building with the roof in place. The only thing left to do is to slot two sliding doors into the doorway.
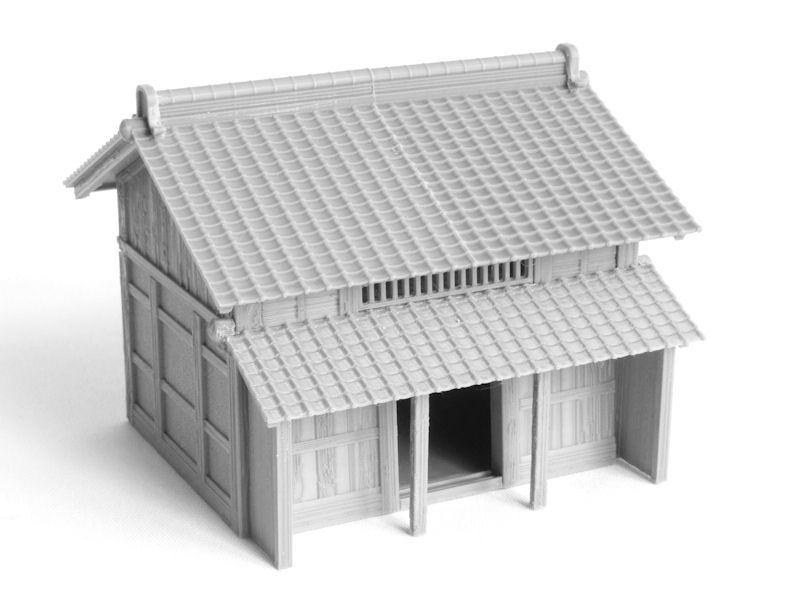
▲ Just as an extra note, you can also use these models as regular two-storey buildings (like in the photo above), if you leave off the front roof section.
▲ Here are some of the blank versions of the signage accessories included in the set. There are curved fabric signs (top left), large wooden signs (top centre), a new LED standing sign (top right), small paper and wood signs, menu plaques for windows, large noren curtains for the front doorway, short and long noren curtains, and two types of paper lantern.
Some of the shop accessory sets will also include specific versions of these signs, featuring kanji characters.

▲ One last photo to show you today, featuring three example shops. These don't include any of the shop accessory sets which will really bring them to life (see the next blog article for these!), but even from this photo you can see the wide variety of building style you can create from this set. The possibilities really are endless!
Here's a new set of modular terrain for the samurai collection... SHOPS!!!
Have you ever wanted to fight a battle amongst the busy streets of a samurai town, dashing around and inside a variety of shops and trading stores? Well, we've got just the set for you!
Work is almost complete on a large set of shop buildings, and these ones are modular! The basic building is a two-storey wooden shop, with a massive selection of wall types and accessory sets. 
▲ This photo shows the kind of scene you'll be able to create with this set. There are 3 wall types for the first level, plus 5 different frontages. The second levels have 3 wall types too, plus 5 or 6 different frontages. The fronts on both levels can be fitted with a variety of windows, too!
There are even 2 different heights you can use for the second level, so you can have a low storage room on the second floor, or a full-height room. The roof can be either tiled or wood, weighted down with rocks. A small projecting roof at the front of the shop, to protect customers from the rain, is also available in tiled or wood types.
Here are 3 different building examples for you to take a look at....

▲ This is a good example of how different the shop buildings can look, with a variety of building heights, wall and roof types, and signage on display. Let's take a closer look at each example...

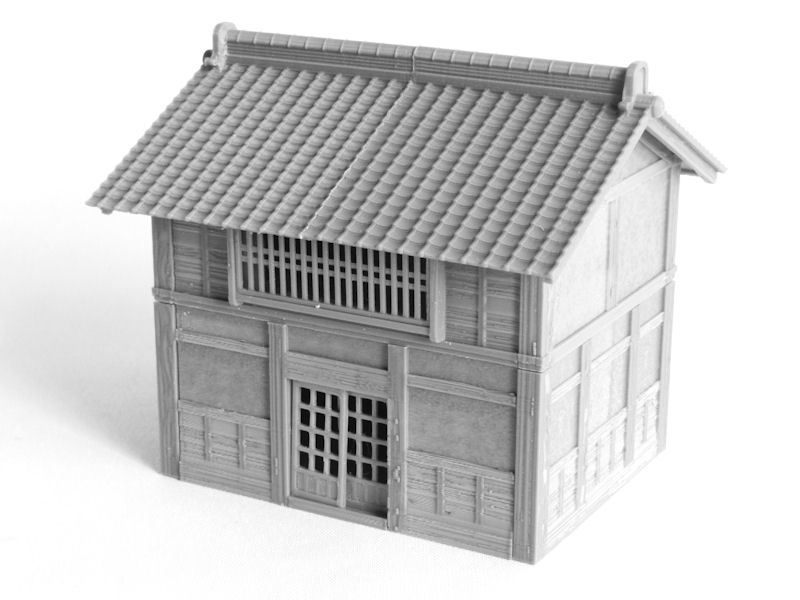
▲ This shop has a low second storey, with a grill window under that overhanging roof, and more windows at street level. A short length of noren curtain is hanging in front of the sliding doors, and a small wooden sign is hanging on the post on the left.

▲ This is perhaps the fanciest of the three example shops, because it has a full-height second storey, with a tatami mat room inside. Next to the long barred window on the second storey is a small paper sign with a roof, and the roof at the front has a large wooden sign on top.
This shop also features two large projecting display windows, and a large paper shop sign outside. The lantern can be fitted with a small LED bulb to light it up.

▲ Finally, we come to the third example shop, which features a wooden roof weighted down with rocks (to prevent it flying off in typhoons). This shop has sliding doors along the length of its front, and a large fabric sign on the right.
As you'd expect the set comes with loads of options for signage - large wooden signs, small wooden signs, two types of paper box sign, normal and oversized noren curtains, large fabric signs, two types of paper lanterns, an option for wooden menu plaques on windows, and even a paper sign lantern suitable for LEDs!
Both floors of the building are fully detailed (with connecting stairs between the levels), and you'll be able to choose from 8 accessory sets for the interior and exterior of your shop:
Phew! That's a lot of stuff! So basically, it's a fairly HUGE set of modular shops, and I can't wait to get test printing soon....
There's a new terrain board on display at our little studio here in Aso (Japan), mixing the temple walls and the temple bell with the big pagoda, with a scattering of festival market stalls and even the new ruined hut model!
So come and take a look, and transport yourself back into feudal Japan....
▲ Foolishly, I only printed 4 temple wall sections in addition to the big temple gate building, and while they make a great solid wall of terrain to cover one edge of a board, it's harder to bring that wall into the centre of a table - so this was the slightly unorthodox arrangement I came up with!

▲ The street right outside a large temple makes a great setting for an impromptu market, so I've placed them at intervals alongside the road and the large bridge.
The mat, by the way, is a design called "Treasure Island" by Playmats.eu. The models are mostly metal minis by Warlord Games, Grey for Now Games (creators of the Test of Honour game), and Perry Miniatures.
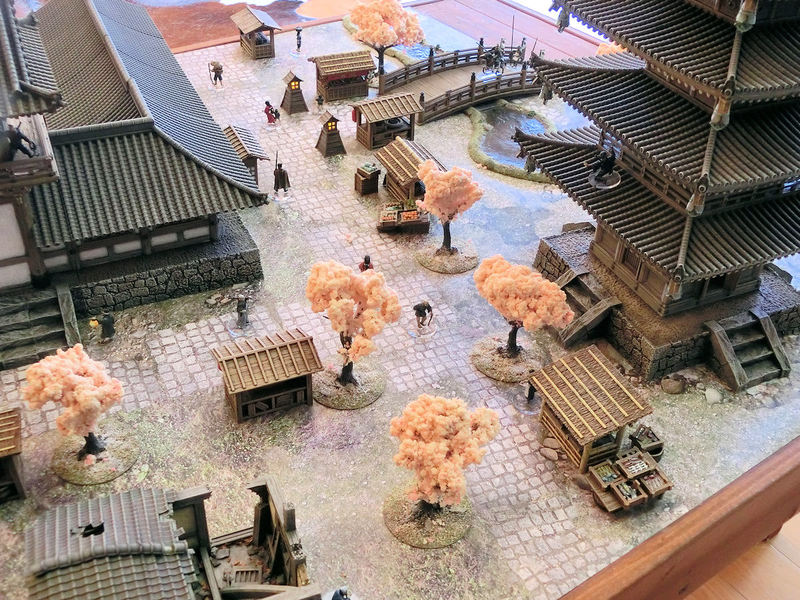
▲ Cherry blossom tress always make a board look alive, and bring some much-needed colour to all that faded wood and roof tile grey!
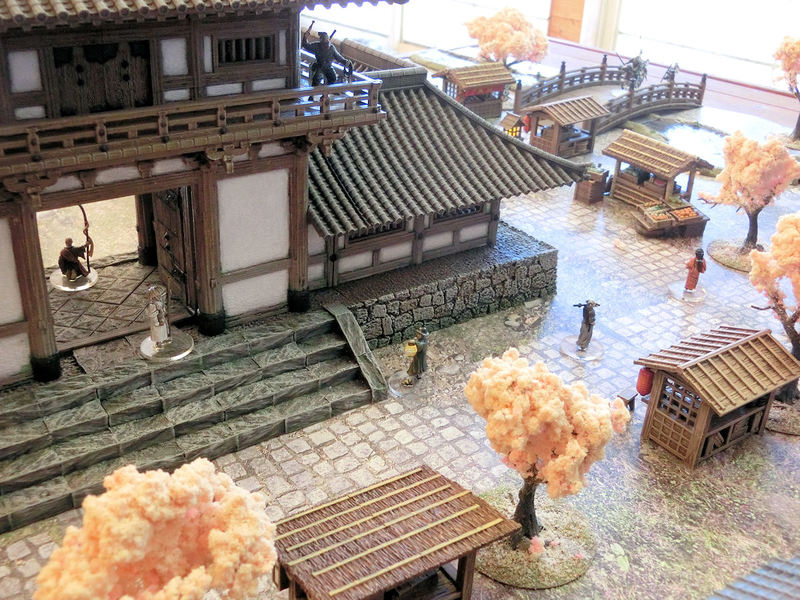
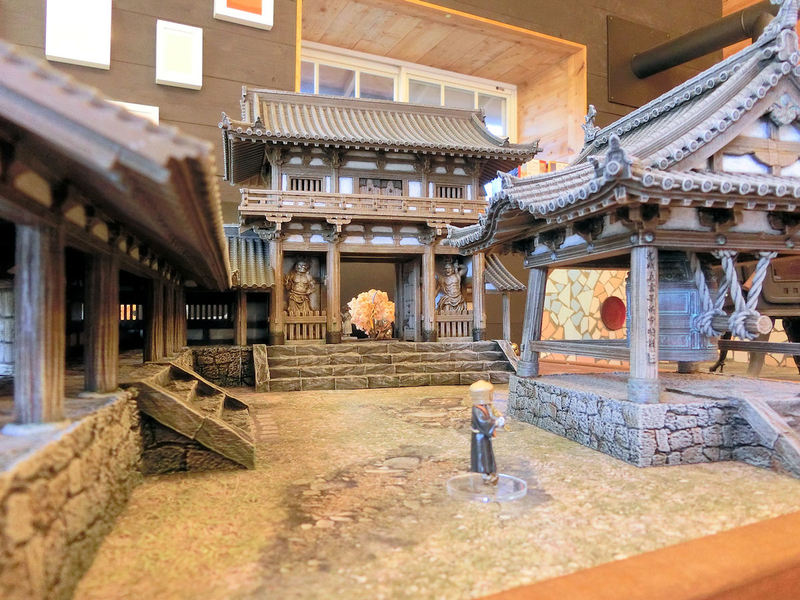
▲ Here you can see a local watchman checking in with one of the temple priests at the temple gate. But is everything really calm and peaceful?
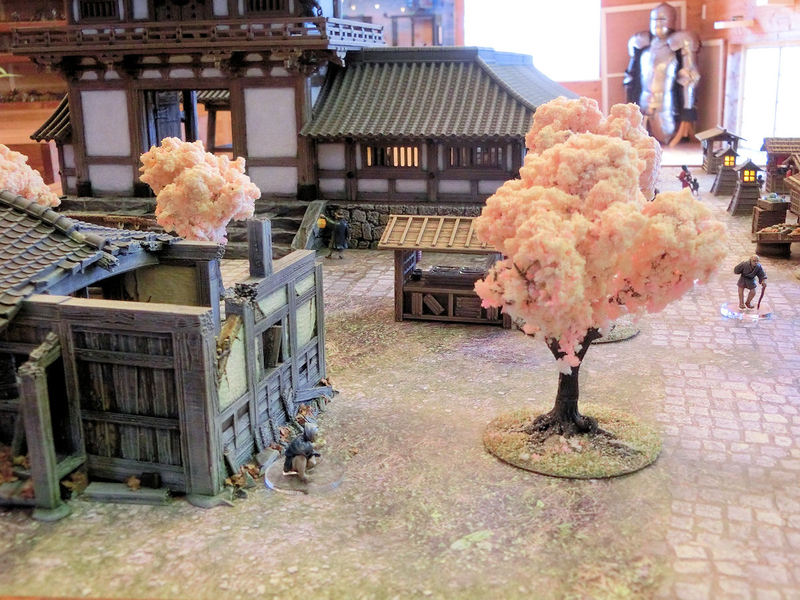
▲ This is stinky old Jiro, the local drunk, enjoying his early morning bowl of shochu (potato alcohol) by the ruins of an old hut.
▲ Inside the temple walls, everything seems tranquil and calm, as a basket-headed priest quietly plays his shakuhachi flute beside the ancient temple bell.

▲ Stall holders carry tubs of water from the stream, oblivious to the lurking danger.

▲ .... if you haven't spotted the dangers by now, then you'd definitely be going home with a shuriken star in your hat!


0 Comments :
Write a comment :