3d-printable terrain for all your samurai wargaming needs


It's been about 3 weeks since the Dice Tower Pagoda model was printed and assembled - sorry for the delay! You'll be happy to hear that both the Dice Tower AND the Sumo Ring have been fully painted now, and will be released over the next few days!
Here's a how-to-paint guide for the new dice tower model, which I decided to paint in a very bright RED colour scheme, just to make it different from its big brother, the wooden Temple Pagoda. 
£ You've got two main options for this dice tower - brown wood (either light brown or dark brown), or red painted wood. You can paint the roof in a variety of different colours (black, grey, red, brown, green, blue etc.), however, and also the bells and spire (gold, black iron, verdigris copper, etc.).
I've chosen to paint this dice tower red, which is a colour scheme found in both Buddhist temples and Shinto shrines. I sprayed each piece in matt undercoat using rattlecans. The stone part of the base section was undercoated in black, the wooden parts in light brown, the roof parts in slate grey, and the spire and bells in gold.
I didn't have a red undercoat spray handy, so I had to handpaint each level section in red. It did take a while! I really recommend saving time by spray undercoating these pieces if you can!

£ Here's a handy tip for spray undercoating the bells - the best way seems to be to stick them all upside down to a strip of parcel tape. It's got enough adhesion to stop them from falling over during spraying, but they are still easy to remove when you're done!

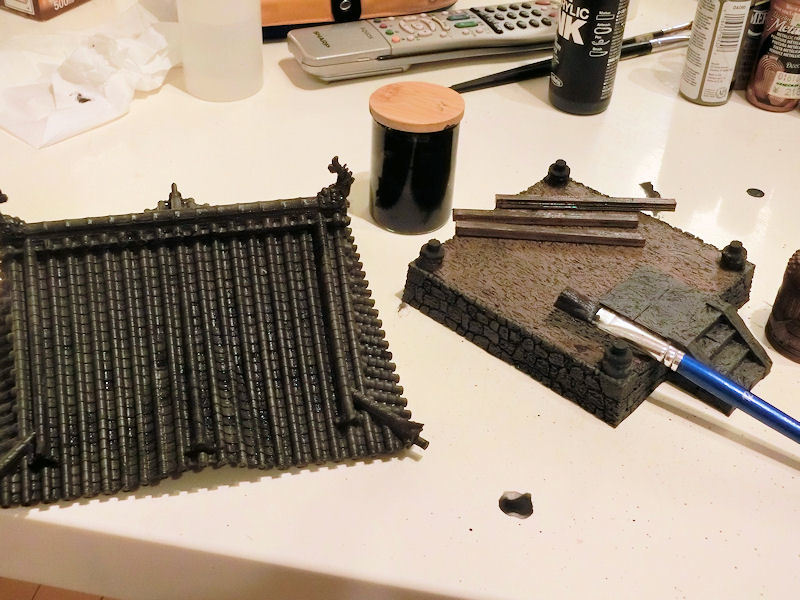
£ You'll probably find it easier to paint each base section separately, and then glue them together. I started by brushing medium grey on the stone sections, then washing heavily in black wash, and then drybrushing up to light grey. I also added dabs of brown and red washes on random stones to add interest.
The wooden parts were washed in black, and then drybrushed with light browns. These sections were then glued together, and the bottom planks of the tower were painted in red.
I also dabbed green wash around the bottom of each post and stone, to add some weathering and age effects.

£ The dice tray was washed in black wash, and then the stone parts were drybrushed up to light grey.
Next I basecoated the bamboo fence in sandy yellow.

£ After a brown wash on the bamboo, I drybrushed up with a sandy yellow again, and then edge drybrushed with a flesh colour. Then I painted the rope knots with dark grey and washed each one with black wash.
When the whole model was assembled at the end, I also added area of brown and red wash to the stones, and then green wash in the corners and at the bottoms of stones.

£ The roof sections had been spray undercoated in slate grey, and I then washed each section with a heavy coat of black wash. When it had completely dried, I drybrushed with medium grey, and again with light grey, using a big 5cm-wide brush.

£ The red used on temples and shrines in Japan is actually a special orangey-red paint, also reserved for the wood-carved name stamps used on official and religious forms. I tried to duplicate this by giving a thick red undercoat, and then a thin brown wash on all the wooden sections.
This made it a little dark, so it took two drybrush attempts to bring those wooden areas back up to a bright red again, and I finished off by lightly drybrushing the edges with a red-orange mix of paint.

£ The stucco panels came next, with an even coat of very light grey. I then coloured in the middle of each panel with white, and I had to do this 2-3 times to get the white smooth(ish). At least each subsequent coat of white covered a smaller area, and got quicker and quicker!

£ I gave a light coat of brown wash to the gold spire and bells, and then drybrushed with the brightest shade of gold I owned. However, it still wasn't quite light enough, so I also gave it a very gentle drybrush of silver on the edges.

£ The last stage was to paint the underside of each roof section. This did take quite a few hours, because I had to paint using a brush - getting it into all the nooks and crannies is hard! I wish I'd had a red spray can available to save time!
I didn't bother washing this with brown (as I did for the 3 level sections), and instead moved straight onto drybrushing with the orange-red mix, just to make the edges pop.

£ Painting these white stripes was also quite time-consuming, especially as they'll be mostly hidden in the final photos! I painted them with 2 coats of white each, and a thin but flat brush.
One final detail that adds a bit of realism to this colour scheme is to paint the ends of each beam in yellow. It might sound odd, but it is commonly done on temples and shrines for this red colour scheme.
And that was it! Finally, my dice pagoda was painted. I glued the bells into the roof sections, and glued each room onto each roof section.
Time to roll some dice....
The new Sumo Ring has been a great painting project this month - with some unique challenges and some wonderful sumo wrestler minis from Fish Creek 3D printed up and painted specially to match!
Here are a few tips for those of you wanting to tackle this upcoming release....
£ First thing was some cleanup on the model. This wasn't a problem in the STL files, but my printer had a hiccup during printing, and produced a tiny layer shift about halfway through the print. This meant that the corner posts and curtains all had a small line through them, which I needed to fix.
In the photo above, you can see I actually used some wood putty smoothed over the cracks with a wet finger. Obviously greenstuff or modelling putty would be another good option, but mine had dried up - so I had to use whatever was available!

£ On to the painting..... I started with my usual technique of undercoating and basecoating with some matt acrylic rattlecans. Black for the base section, light brown for the frame and underside of the roof, and slate grey for the top side of the roof section.

£ The base section was then roughly blocked in with medium grey for the stone, medium brown for the dirt, sandy brown for the ring of small rice bails, and a lighter grey/brown for the clay surface of the inner ring.

£ Next, everything gets a heavy coat of black wash, and is then left to dry overnight.

£ Next comes the drybrushing. Using a big 5cm-wide brush, I drybrushed the stone areas of the base in medium grey and then light grey, and the dirt and sand in various shades of light brown.
The frame was drybrushed in light brown using the same big brush, but for the smaller areas of the roof section I switched to a smaller 1cm-wide brush, and I then carefully drybrushed the wooden beams.

£ The last section to be drybrushed was the roof of the sumo ring, which was done using the big 5cm-wide brush in medium grey, and then very lightly in light grey, by just scraping it over the edges of tiles and ridges.

£ It was at this point that the awesome miniatures from FishCreek3D arrived in the post, and I couldn't help snapping a quick photo for you guys watching on Facebook!
I don't have a resin printer myself, so I ordered these models printed - and they were kind enough to resize from their normal 32mm scale down to 28mm scale. As you can see, the size and quality are absolutely perfect!

£ I decided to paint my curtains in purple, with motif crests in white. Other common colours are darker reds and blues. But here I hit a problem - I didn't have any suitable transfers that were white!
So I decided to print my own custom transfers, but of course I can't print in white. The printer (a normal computer inkjet printer) can only print colours, so I had to print the purple of the area around the crests, and leave the crests themselves as clear transfer paper.
To that end, I painted the middle of each curtain white in preparation, and did some simple shading with light grey.

£ Next I had to print the custom design on transfer paper. I had some special transfer paper (you can buy it at any good computer store), which required me to print the design in a mirror image, and by trial and error I found that if your crests are about 18mm wide (as circles), they will fit neatly on each curtain.
TIP: If you paint each area with gloss varnish before applying a transfer, it makes it easier to adjust a transfer by gently nudging it sideways into position.

£ The next stage was applying the custom transfers. These ones need to be pushed gently on to the model, and then water is applied to the back of the transfer to loosen them from the paper.

£ After 1 ~ 2 minutes, the water will loosen the backing paper from the transfer decal, and it can be gently slid off the model.

£ After the water has dried from each transfer, I recommend one last step - a coat of clear medium such as Lahmian Medium (by Games Workshop) seems to help remove the shine from transfers and soften any edges.
As you can see from the photo above, I was a bit too enthusiastic in pushing the transfer paper onto the bumps in the fabric before it was fully dry, and a few bits of ink seem to have bled onto white areas. That is one of the risks of home-made transfers, as opposed to shop-bought transfers!

£ When everything was fully dry, I painted in the rest of the purple areas around each feather shape, and added a little bit of highlighting on the ridges. Then I had to tidy up a few bits of white, where the ink had bled.
The last step for the curtains was to paint light grey and then white onto the curtain loops at the top.
Phew - done! A little bit time-consuming, but it looks great with so many detailed designs on the curtains!

£ All the pieces have now been undercoated, washed, drybrushed and highlighted - so it's time to glue everything together!
The last part is to add some weathering and aging, with brown and red washes dabbed on to the stones of the base, and then finally some green wash on the bottom edges to indicate mould growing in various places.
With that, the model was complete, so the sumo ring is due to be released just as soon as the wrestler models have been finished! Watch this space....
The first of this month's new designs has made its way from the paint desk to the photo booth, so I'm proud to announce that the new Samurai Temple Bell is now available for download!

£ Just look at that giant chunk of metal! With a suitable ancient paint job, that bell looks seriously heavy.

£ An ancient temple shōrō bell tower from old Japan. A large stone base and steps lead up to the bell tower, which features an ornate hip-and-gable tiled roof. The large central bell comes with a heavy wooden striking beam suspended from thick ropes, and has been carefully detailed.

£ It measures 180mm (7") tall, with a table footprint of 153mm x 125mm (6" x 5"). Since it's not line-of-sight blocking for your models, it makes a fantastic piece of light cover or objective, or just an atmospheric piece of terrain.

£ You have to ask yourself, if YOU were a ninja assassin, where would YOU hide?!

The new Samurai Temple Bell is available for download from today!
(turn up your sound for the BONNNGGGGGG!)
With so many new models sitting on my paint desk, it's actually the most recently printed one that reaches the finish line first!
The new Temple Bell model turned out to be the simplest of the 3 models to paint, and here's a quick how-to-paint guide to show you what I did ...

£ Spray undercoats are the way to get this project started FAST! I undercoated the base and bell in black, the roof section in slate grey, and the roof underside and frame in light brown.

£ I gave the base section a quick brush with neutral grey on the stonework, and sable brown for the sand/dirt areas. The bell was given a thick coat of copper metallic paint.
£ Next comes the messy stage - washes! Every single piece was given a thick coat of home-made black wash (a mix of acrylic ink, a few drops of matt medium, and some water). That darkens everything down and gives instant shading.

£ The next morning it was time to start drybrushing up the model. The base section was drybrushed using a thick (5cm-wide!) brush in neutral grey, and then more lightly in lighter greys. The dirt surfaces were drybrushed in sable brown again, and then a lightgrey/lightbrown mix.
£ The wooden frame was drybrushed in mid and light brown, and then a little drybrush of light grey was done over the bottom ends of each corner post, where the sun would slowly bleach the wood over time.
It was time to move on to smaller details, so I basecoated the rope in Driftwood (as shown above), and then gave it a black wash.
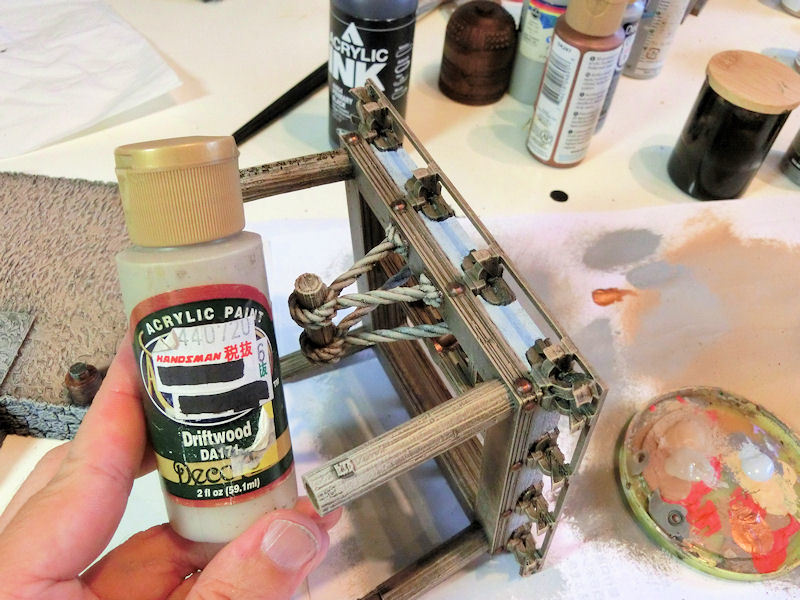
£ It was a little hard to keep rotating the model around in my hands, but I highlighted back up to Driftwood again, leaving the black wash in the crevices.
At this stage the frame and base are mostly finished, so I glued them together.

£ Time for some verdigris copper! This photo of the giant bell at Chion temple was my goal for the temple bell, and it actually isn't that difficult to replicate.
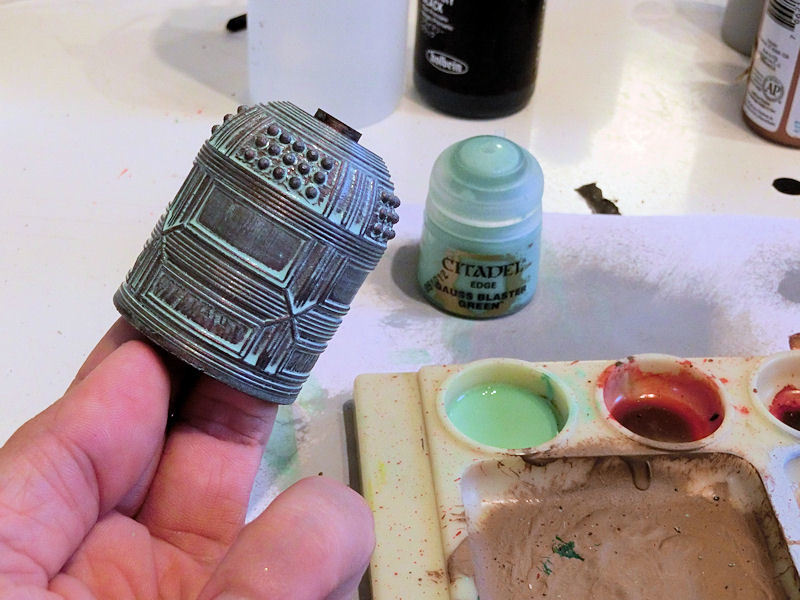
£ Firstly, the copper basecoat was dulled down with a black wash, and allowed to dry thoroughly. Then I mixed a verdigris wash from a few drops of mint green paint (GW's Gauss Blaster) and a few drops of water, until it was the consistency of watery milk. This was brushed all over the bell, and left to dry.
An hour or two later, I gave it a second verdigris wash, and left it to dry again - this time upside down, so that the wash pooled in the opposite direction.

£ When it was dry, this was my finished bell. I glued it to the frame (I recommend doing this upside down), and then sliding in the three side beams and gluing those too.
Notice that I also decided to paint the frame studs (at the top) and post bottoms (at the back of the photo) in copper too, just to tie the colour scheme together. I think old copper goes a long way to telling a great story about how long these buildings have been around.

£ The last touches were to add some extra age effects with coloured washes. The base section stones were dabbed with brown and red washes, and then a green wash was added to the bottom edge and various nooks and crannies, to show where mould might grow over time.
With that, my temple bell was finished! Time for some finished photos, and a quick video - watch this space!
Another week, another samurai terrain piece to show off! This week we've been test printing the upcoming Samurai Temple Bell, and here's a quick and easy assembly guide for you to take a look at!

£ The base prints in one easy piece, but it does require a print bed size of 155mm x 123mm - otherwise you will need to print the cut-up version and glue together.

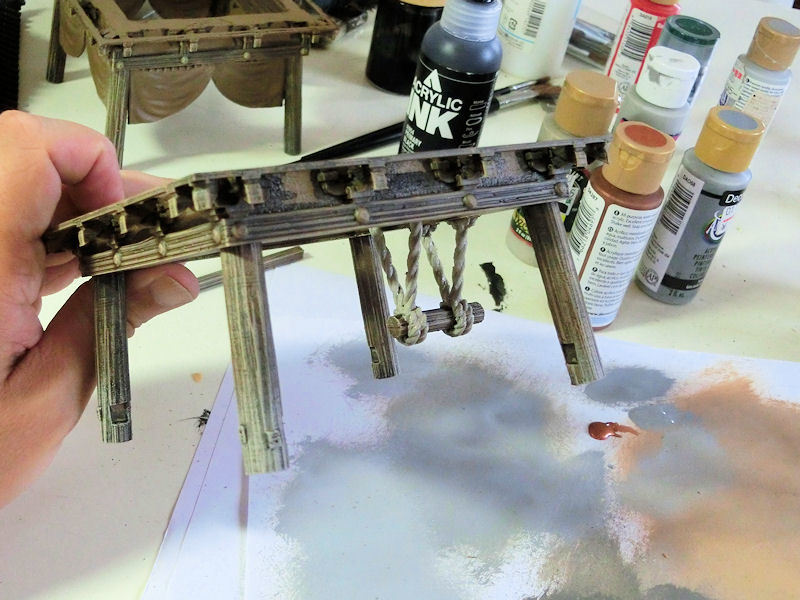
£ The main frame prints in one piece, upside down. It does not require print supports. I recommend slotting the frame into the base BEFORE you add the 3 low beams to the legs, as it will help you to nudge the posts into place on their slots.
The bell simply glues onto the middle of the frame, but I will be painting it separately first. The rope and striking beam prints in two parts, and you might find it helpful to use some print supports there - although it should be possible to print without. The ropes simply slot into place on the frame, and you're ready for the roof.

£ The roof has 5 tiny built-in supports (shown in green in the image above), which should be removed with cutters during assembly.
Print the two halves and glue together, and then finish the model off with two ornamental dragonfish pieces. You're finished!

£ This is the completed temple bell! The roof is pretty glamorous compared to some other models, but temples tend to have those - and this small building is low enough for the ornamentation to be visible to people walking past.

£ I'm particularly pleased how well the kanji text on the front post came out, and the clear shapes of those thick ropes. With some luck, it should also print at 15mm scale without trouble, too!
That's the last of the 3 samurai designs for the moment - now I have to get busy with the painting, and get these ready for download! Watch this space...


2 Comments :
Brandon
2021-10-27 (Wed) 21:47PM
Wow, another great job and another project on my bucket list. I love the details and canft wait to use the railings.
2021-10-27 (Wed) 22:17PM
Thanks, Brandon! The little bamboo fence would probably work really well with ornamental gardens in temples, and adding to ponds, too.
Write a comment :