3d-printable terrain for all your samurai wargaming needs


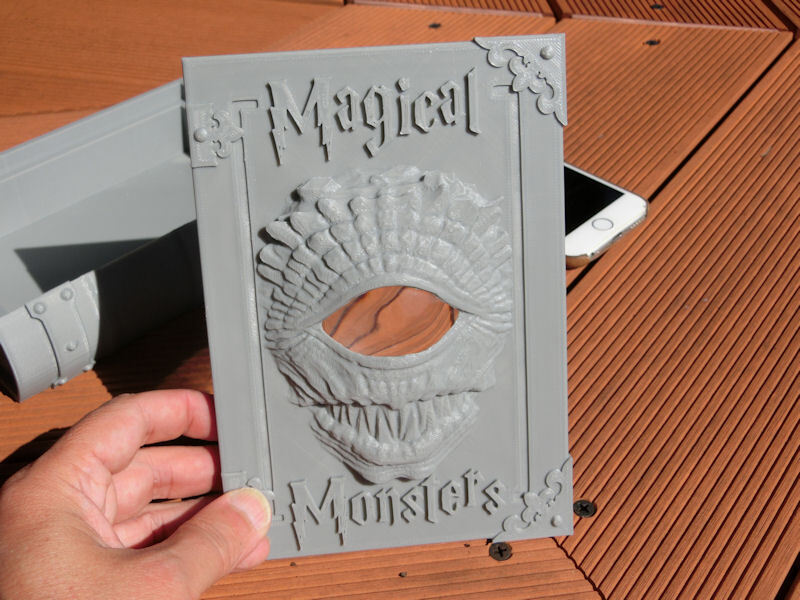
Happy Halloween again, everybody! This is the second little Halloween prop I've knocked up for a party decoration, and I'm posting it up on Thingiverse for free for everybody.
I saw this DIY-ed on YouTube, and I thought it might be good to make one for 3D printers so everyone can make it with minimum effort!

▲ Suitably spooky, eh?
Well, that eyeball moves!! See the video below...

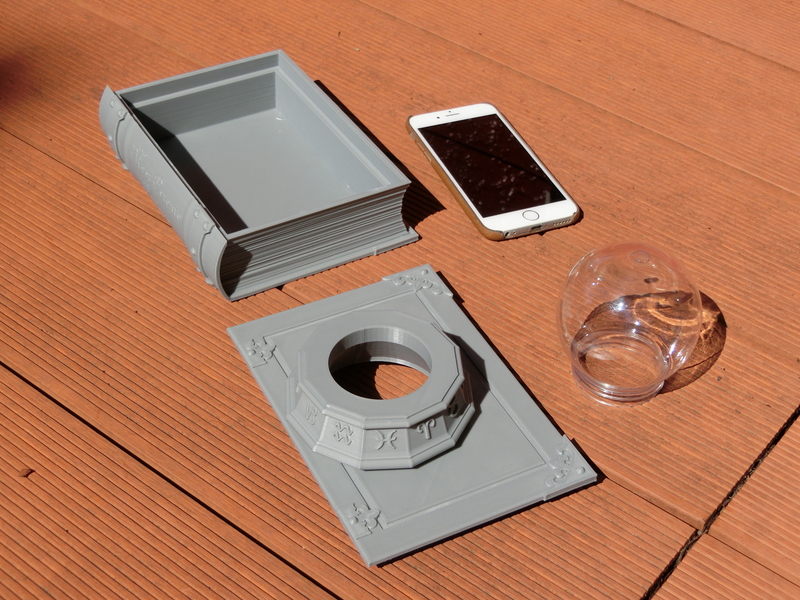
▲ You will need the printed pieces shown in this photo, which are available for free on Thingiverse:
![]() Monster Eyeball Book on Thingiverse
Monster Eyeball Book on Thingiverse
The book has a 160mm space available inside, which should fit most smartphones.

▲ If you add a glass cabochon (curved lense) with a diameter of 50mm it magnifies the eyeball shape and effect, but it's not essential. I got mine on AliExpress for $2.
▲ The hole for the cabochon in the book cover is 50mm in diameter, so please adjust the scale of all 3 pieces to fit the size of hole you need if you buy a bigger one.
Download a suitable eyeball video from YouTube, play it on loop on your smartphone, and you're done! Here's the link to the video file I used:
https://www.3dalienworlds.com/pages/EyeballLoopGreenLandscape.mp4 (8MB)
https://www.3dalienworlds.com/pages/EyeballLoopGreenPortrait.mp4 (8MB)
Ready for the video? Here we go....
Happy Halloween, everybody! This is a fun little Halloween prop I designed and printed, to decorate for an upcoming party. You might have seen it before described as a "Pepper's Ghost" effect, and most people DIY it from an old book etc, and I thought it might be good to make one for 3D printers.
So here's mine...
▲ This looks really cool in a dark room - see video below!
▲ You will need the printed pieces shown in this photo, which are available for free on Thingiverse:
The book has a 160mm space available inside, which should fit most smartphones.
You will also need a crystal ball piece - I bought a plastic snow dome kit from Amazon for about $2 (Artec Snow Globe Kit 55370), which has a diameter of 78mm.

▲ The hole in the book cover is 53mm in diameter, which is what I needed for my snow globe dome, so please adjust the scale of all 3 pieces to fit the size of hole you need.
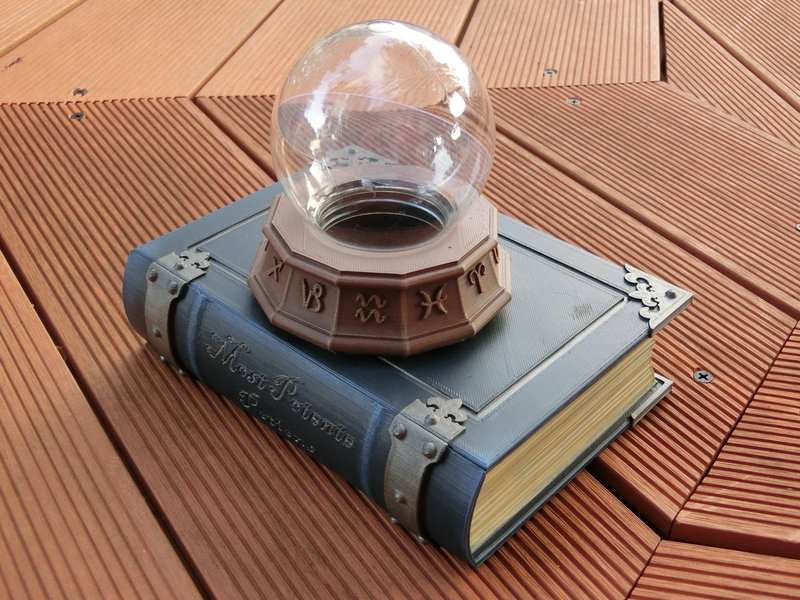
▲ The only other item you will need is a thin piece of clear plastic, cut into a circle and placed inside the crystal ball. I glued it at a 45 degree angle with a couple of dots of hot glue gun.
Download a suitable special effect video from YouTube, play it on loop on your smartphone, and you're done! Here's the MP4 link to the video file I used:
https://www.3dalienworlds.com/pages/EnergyBallLoop.mp4 (18MB)
Here's a video of the Crystal Ball in action....
Recently we've had a few customer requests for the various stone paths from the Shrine Set and the Lord's House Set to be made available as a separate set, so here's a quick release of the 3 sizes of path!
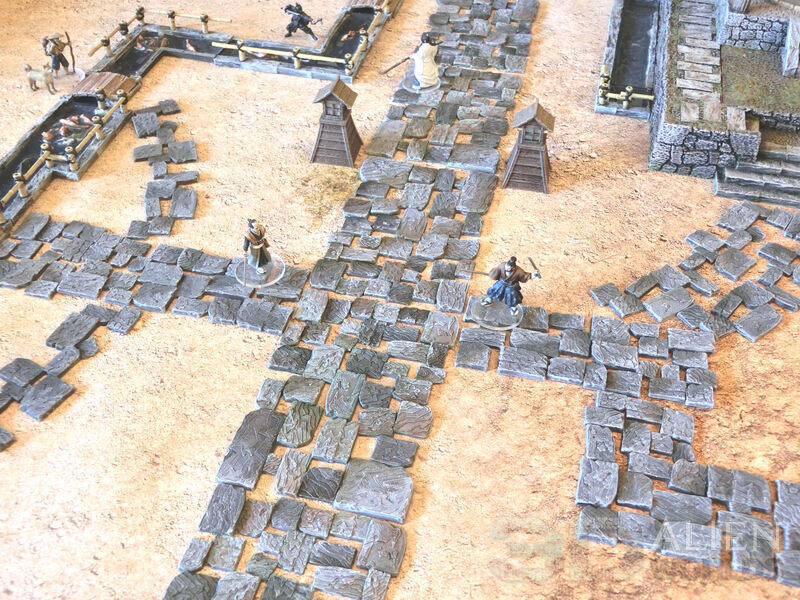
▲ There are 3 widths of path: wide, medium and narrow. They should provide any mix of layout you might need for towns, shrines, temples etc.
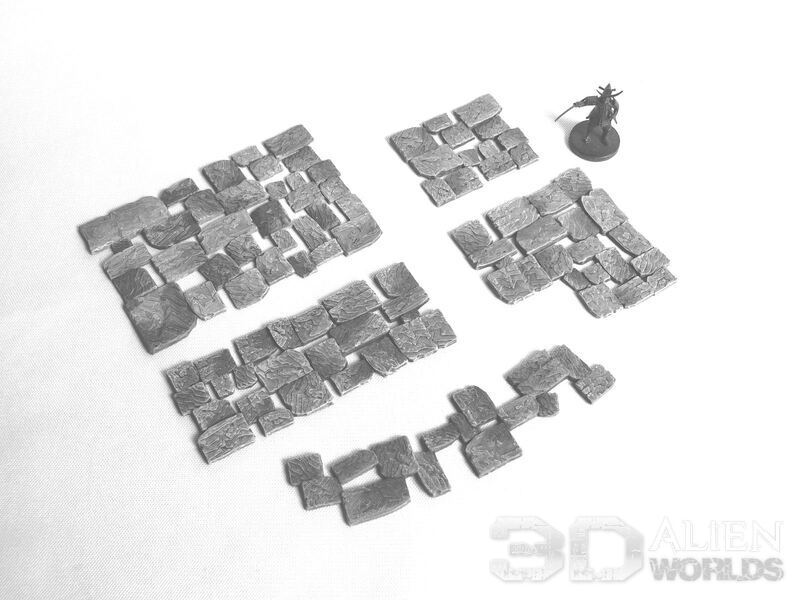
▲ The wide and medium paths are 12cm long, while the curved narrow path is approximately 140mm long.
The medium size path additionally has corner and short sections included.
▲ They can be fitted together to make T-junctions like this, and look great with some simple drybrushing. A few spots of green and brown washes are also recommended, to make them pop!
The Stone Paths set is available from today.
We have some new designs to look at today, for an upcoming fishing village set for the samurai collection.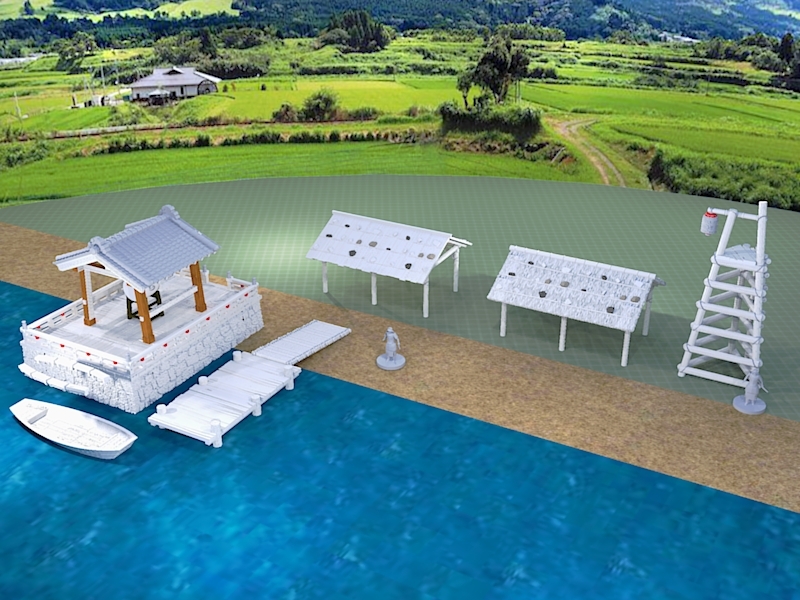
▲ This new design is a fishing village set of terrain from old Japan. This set contains various small terrain pieces and accessories that you would typically find in a small coastal village, and will work great for territory feuds and bandit attacks.
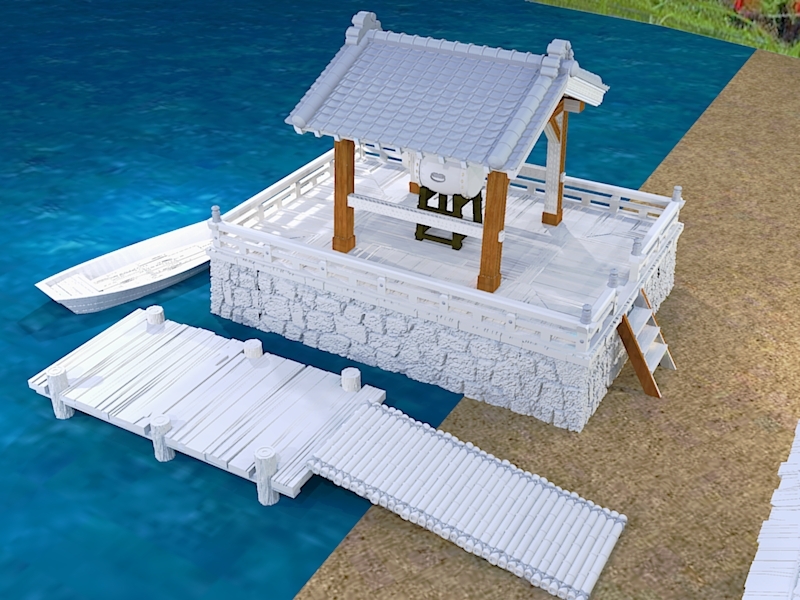
▲ The only permanent terrain building is a large wood and stone platform for a covered taiko drum structure (used to welcome visiting dignitaries), while the rest of the structures are more temporary - designed to be replaced and rebuilt whenever required. These include thatched and wood-roofed sheds, wooden jetties and connecting bamboo bridges and ramps, and a tall warning bell tower. The bell on the tower can be replaced with a lantern to act as a guide for incoming boats.
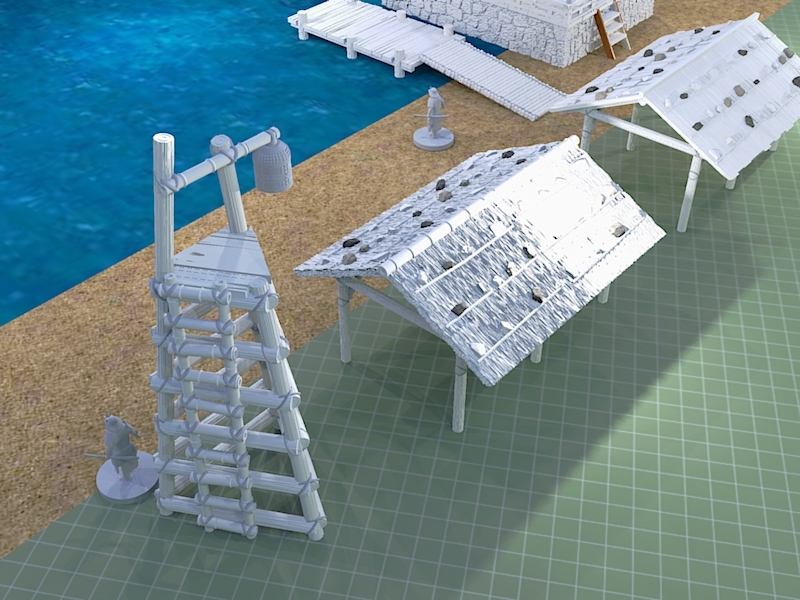
▲ Two sizes of boats are included, along with some natural rock formations themed to the setting, and many, many small scatter items to bring the scene to life - drying racks, fishing traps, boxes, tubs, buckets, and piles of ropes, nets and other detritus.
Welcome to another Test of Honour battle report, our favourite skirmish-level samurai miniature game!
Today we are playing a night scenario, with one samurai imprisoned in the castle managing to slip his bonds and make a daring bid for freedom. We begin the battle as darkness is falling over the town square outside the castle...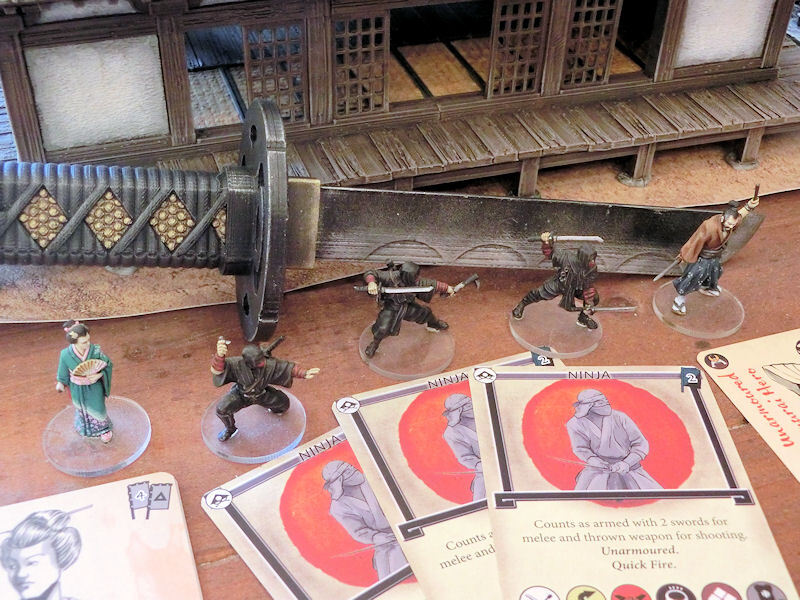
▲ The 'Attackers' in this scenario are a much smaller force (15pts) than the castle defenders (24pts), and Toshiro the samurai hero (on the right) begins the game on the walls of the castle. His supporters in this bid for freedom are his lieutenant, the deadly geisha Tomoko, and 3 individual ninja models. Their objective will be to sneak through the town without being discovered, to be ready to attack when Toshiro is spotted by the defending guards.
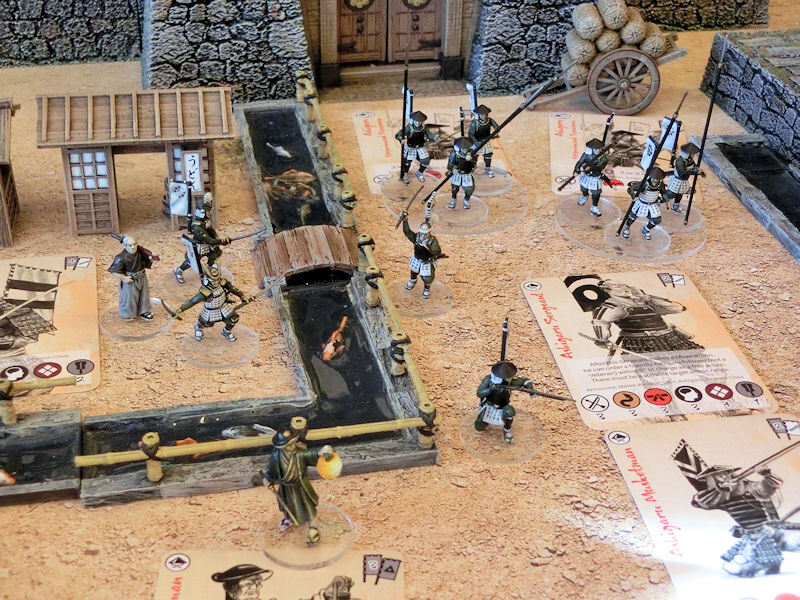
▲ The 'Defenders' include one samurai hero and 2 lieutenants, 2 units of spear-armed guards, a sergeant to order them about, and one musketman. I also used the watchman model from the Unlikely Allies boxed set to support them, because his lantern should help visibility in this night game.

▲ The defending force can place 4 lanterns on the board before the game starts (highlighted with those pools of light), which help the guards spot the escaping prisoner.
However, since the guards are not expecting an escape attempt, they begin the force unaware, and will move around randomly until they see or hear something suspicious - at which point they can be controlled as normal. Some of the defenders also begin the game off the board, and will arrive as reinforcements as they finish their patrols.
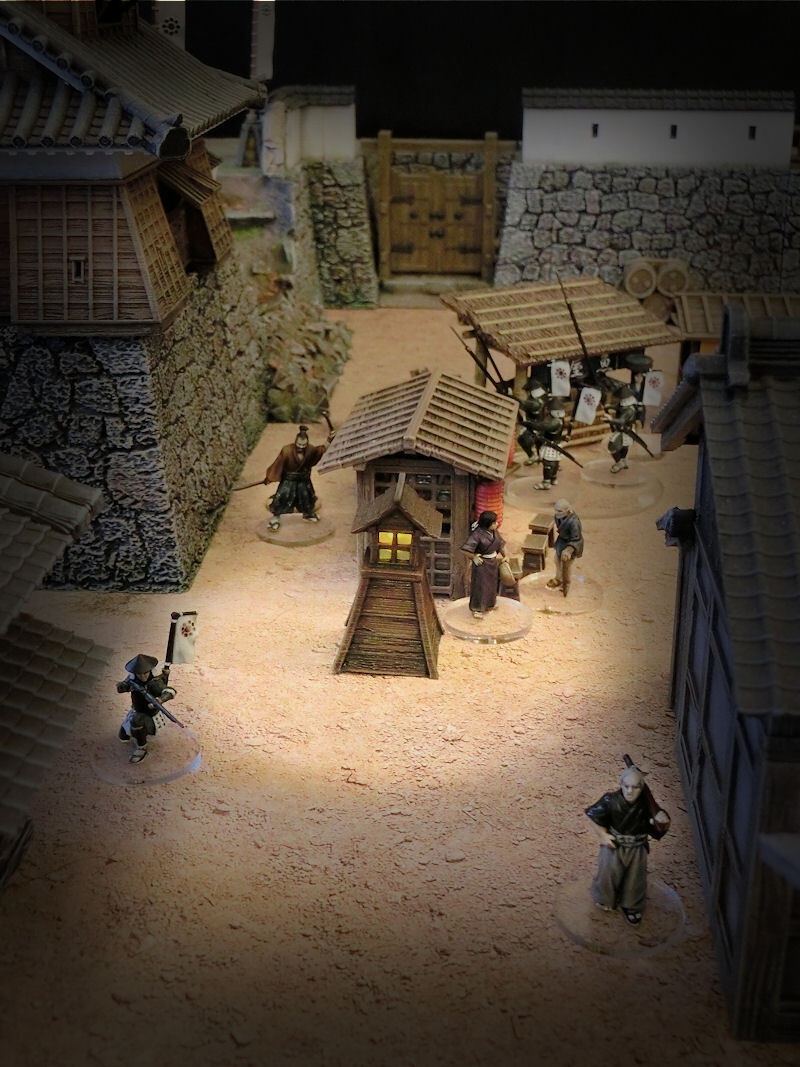
In the board photo above the defenders (circled in white) began the game roughly in the middle of the board near the castle, in an attempt to mitigate the chances of them wandering off in completely the wrong direction and leaving great big holes in the net.
Toshiro the prisoner (circled in red at the top) begins on the castle walls, and has to escape off the bottom table edge to win. Tomoko the geisha and her ninja assassins (also circle in red) begin at the bottom edge, in darkness.
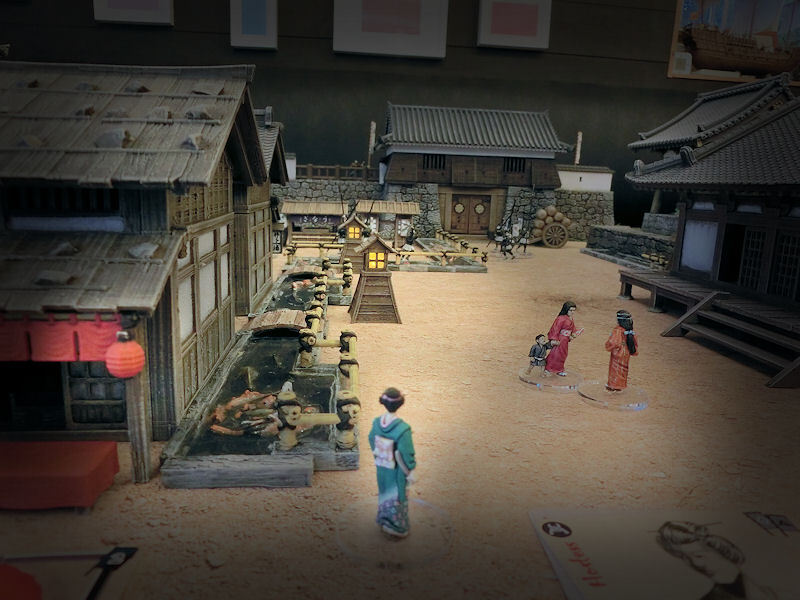
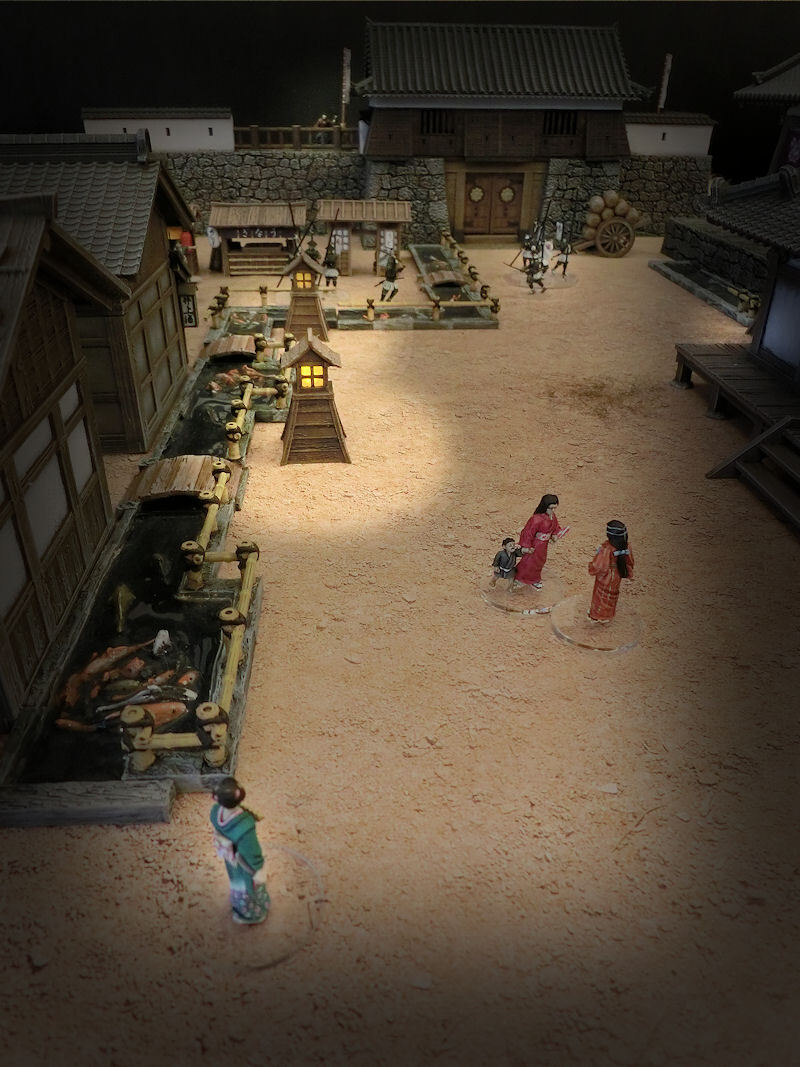
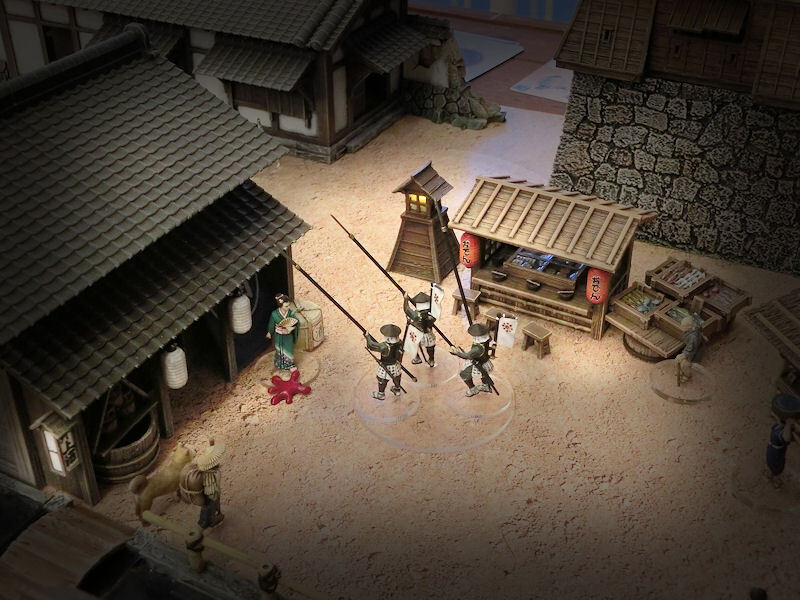
▲ Tomoko the geisha started the game by slowly walking up the main street, trusting to the encroaching darkness and her civilian costume to cover her approach.
▲ The 3 ninja models stealthily crept along the sides of the buildings beside her, while one of them quietly climbed up on to the roof of the tea shop.
In the distance, she could see her lord Toshiro up on the castle walls, ready to begin his escape.
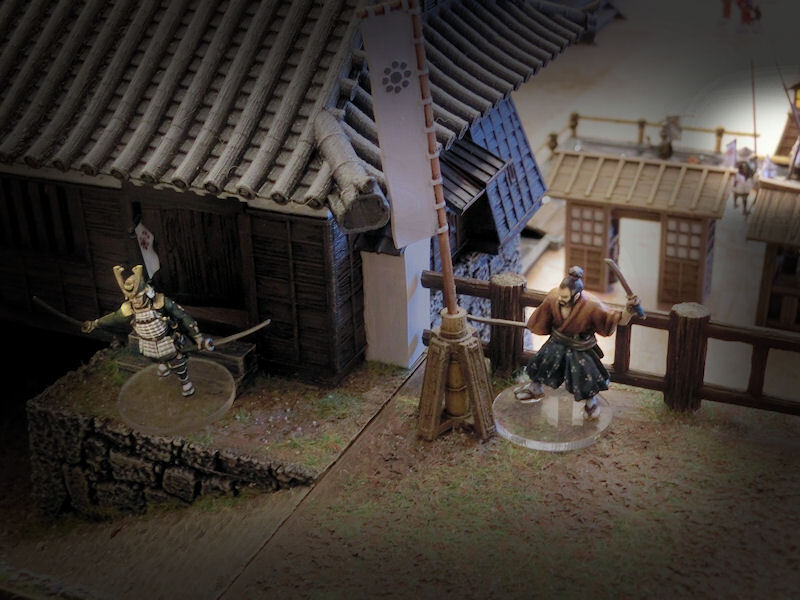
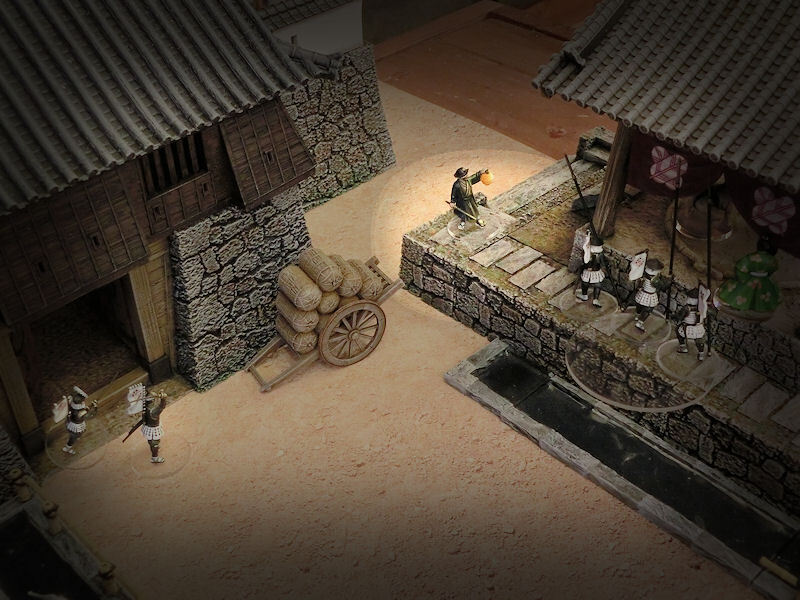
▲ Alas, the samurai leader of the defenders (model on the left) took that exact moment to stroll out of the main gatehouse on to the castle walls. At this point he was still unaware of the escaped prisoner crouching behind the flag stand just a few steps away, but it was surely just a matter of moments before he was noticed!
▲ Pulling another samurai token from the cup before Toshiro had a chance to even move, the defender's samurai hero took a Test of Wits to notice the escaped prisoner nearby, and immediately charged in to attack. This surely meant a great early lead for the defenders?
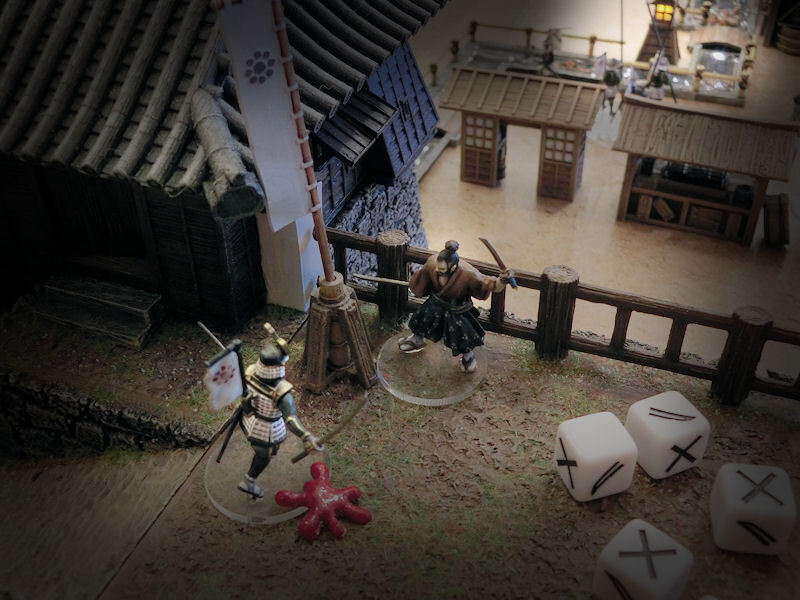
Unfortunately luck was not with him as he charged in, and he tripped and stumbled in the darkness, twisting an ankle and giving himself the game's first blood-drop!!

▲ Toshiro, thanking his lucky stars, took the big risk of quickly dropping down from the castle walls into the marketplace. As he lightly landed on his feet, he glanced up to see the enemy leader above him scanning for him in the darkness.
This left a problem for the enemy samurai trying to follow the prisoner, as he only had one more action token, and even if he safely jumped down the walls he would be at the mercy of an angry Toshiro and might easily be cut down!

▲ The other defenders had slowly started to wander off in random directions, and this wise old samurai (model on the left) decided to stroll off past the shops. He was still completely unaware of the escape attempt, so he failed to spot the ninja warrior on the rooftop above him.
Tomoko the geisha also decided to casually shuffle down the alleyway between the shops, ready to pounce on the unsuspecting old man when the time was right.
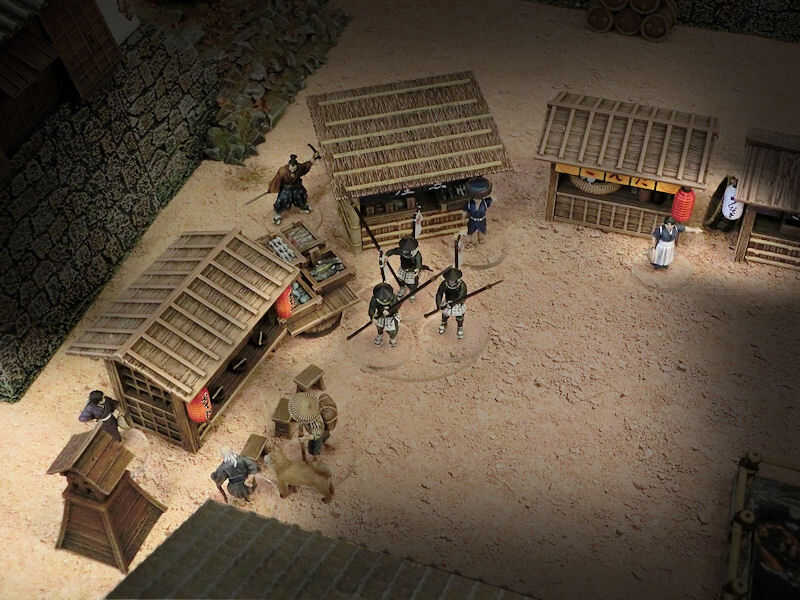
▲ Meanwhile, Toshiro had dashed away from the castle walls towards the back of the market stalls. As the oden stall vendor chatted with her customers, Toshiro ducked down into a corner.
The defenders got their second stroke of luck in the game so far, as a group of castle guards randomly marched over towards Toshiro's hiding place, perhaps drawn by the mouthwatering smells of food coming from the stall's hotpot.
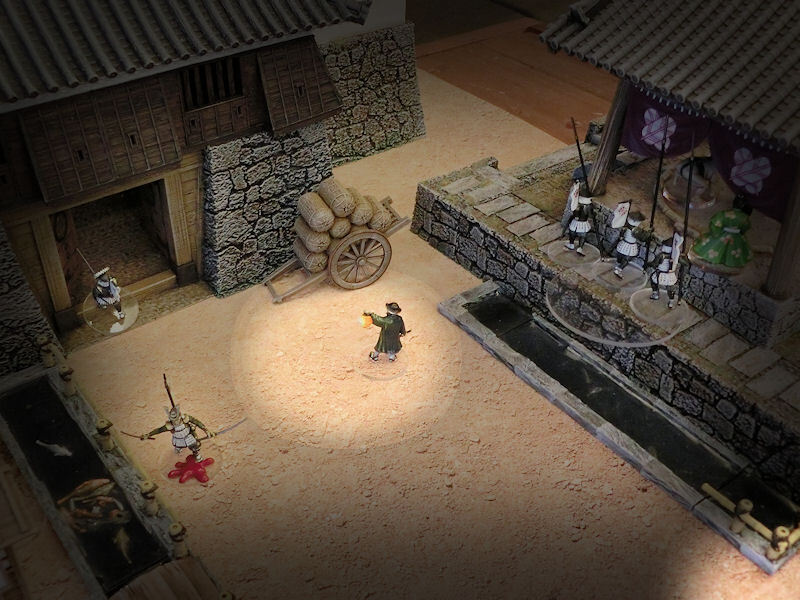
One guard at least was concentrating on his job properly, as he spotted Toshiro and shouted the alarm to his mates! Pushing aside the boxes and tubs, they charged in straight away, but failed to land an attack on the escaped prisoner.
▲ As the guards stumbled back from the fight, Toshiro quickly dodged away, but hesitated before running into the pool of light from the nearby lantern. The defenders would soon all be alerted! Was this the time to just run for it?
▲ Toshiro's indecision cost him dearly, as a new enemy reinforcement appeared on the board, just a few steps in front of him. Thankfully, the lone musketman failed to spot him in the darkness, but surely he was only moments from discovery....

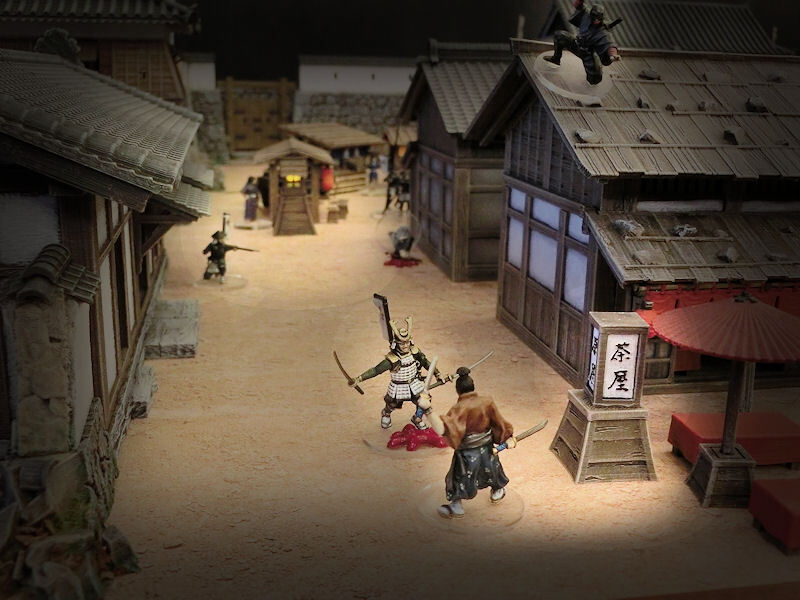
▲ It was time to spring the trap!
The ninja on the tea shop roof threw a knife down at the unarmoured samurai below him, and managed to get a blood-drop on him. The old man instantly woke up from his daydreams, and scanned the area for the hidden assassin!

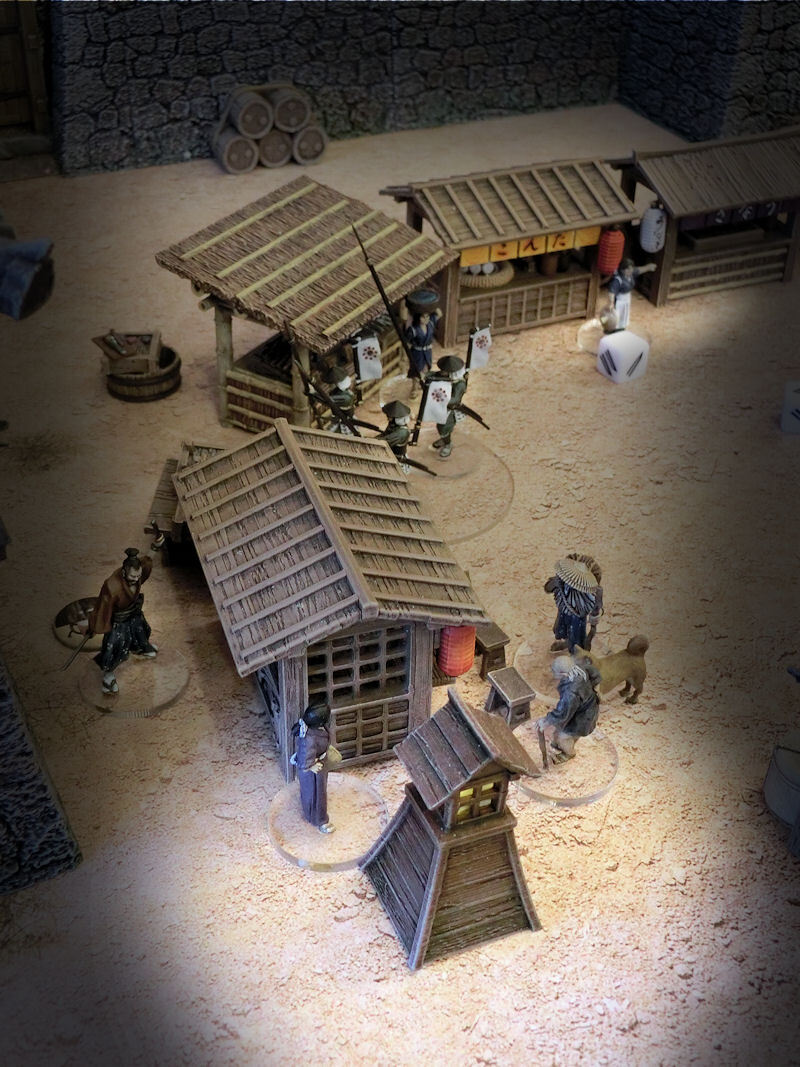
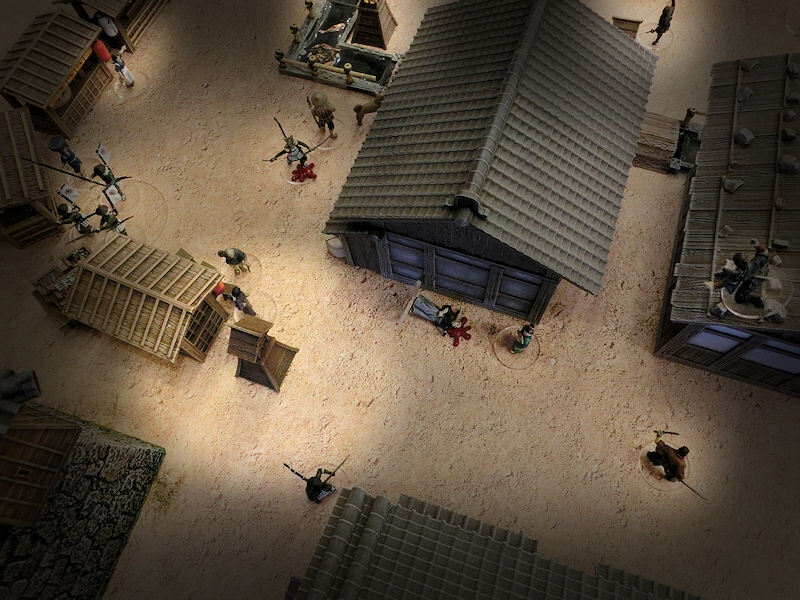
▲ The samurai hero who had earlier attacked Toshiro up on the castle walls had, by this time, rushed out of the main castle gates in an attempt to run through his guard units and alert them to the escape.
However, in the darkness all 4 models (sergeant, samurai lieutenant, watchman AND group of spearmen) all failed their tests to work out what was going on, and instead randomly rushed off in different directions!! Perhaps the lieutenant thought his captain was alerting him to an escape attempt going on INSIDE the walls, which might explain why he immediately rushed back INTO the castle gatehouse?!
Idiot.
▲ The poor training of the guards was beginning to cause real problems for the defending player, as half of his force was now running away into random corners of the board, and as such they were even less likely to hear or see the enemy and join in the game properly!
▲ Tomoko the geisha rushed around the corner, charging into the wise old samurai. Luck was with her, as the enemy lieutenant was swiftly cut down by her flashing blade.
The musketman nearby was alerted by the fracas across the street, and quickly spun around to fire off a shot at the escapee as he rushed past, but Toshiro was nimble enough to dodge out of the way!
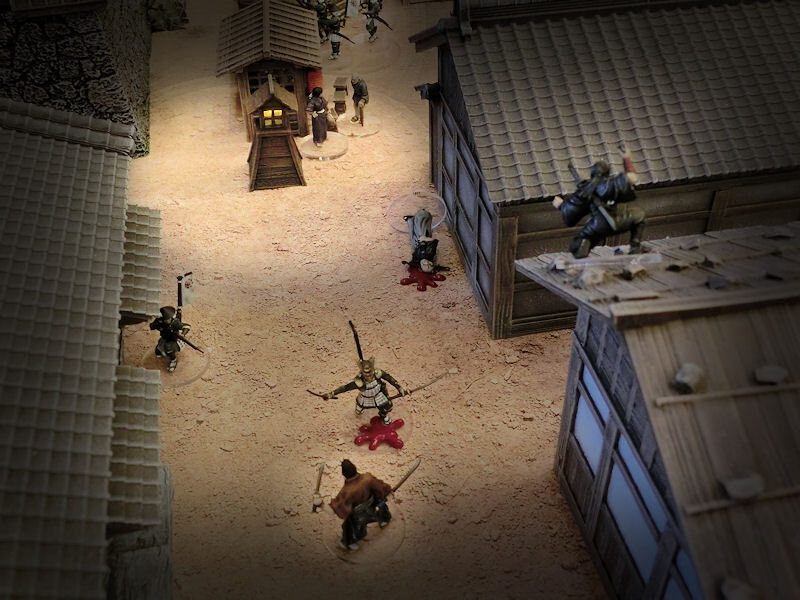
▲ As the musketman frantically reloaded his gun, his samurai captain charged down the street after the escaping prisoner, furious for revenge. After a quick exchange of blows, both warriors drew apart. Had the delay been enough for more guards to arrive in support?
▲ No, it seemed not! Tomoko the geisha had decided to buy her lord more time, by running into the marketplace and engaging the spearmen in a desperate fight. She was injured in return by their countercharge, but neither side backed off. It looked like the distraction might be enough....
▲ Oh look, the idiots among the defending force spent another entire turn bumbling around in the darkness, wandering even further away from the fighting!! The spearmen and the watchman, in particular, thought perhaps something was going on in the sumo ring, and decided to search it carefully.
I don't think they'll be getting promoted any time soon, do you?!
▲ While the ninja above them rained down more throwing knives, the samurai captain tried one last attempt to hold the escaping Toshiro in place, but was unable to cut him down.
As the prisoner dashed away off the board to safety, the samurai captain screamed his anger into the darkness after him. Then, spinning around back towards the castle, he swore that his idiot guardsmen were due for some serious punishment for their incompetence tonight!
Victory to Toshiro for escaping the castle, and Tomoko and her ninja for a well-timed rescue.


0 Comments :
Write a comment :