3d-printable terrain for all your samurai wargaming needs


Well, the new samurai Teahouse Set is now fully painted, and ready for release tomorrow!! Oh, and what gorgeous photos I managed to pose for you! hehehe
But today we take a look at how you can quickly and easily paint up your teahouse and accessories....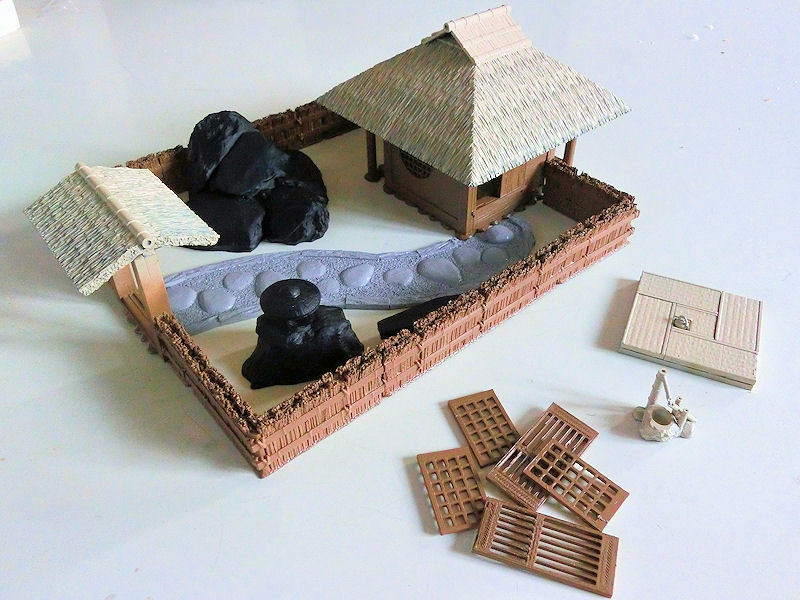
£ To start with, all the parts were spray undercoated with cheap matt paint, which left them looking rather like kids' toys!
ROCKS: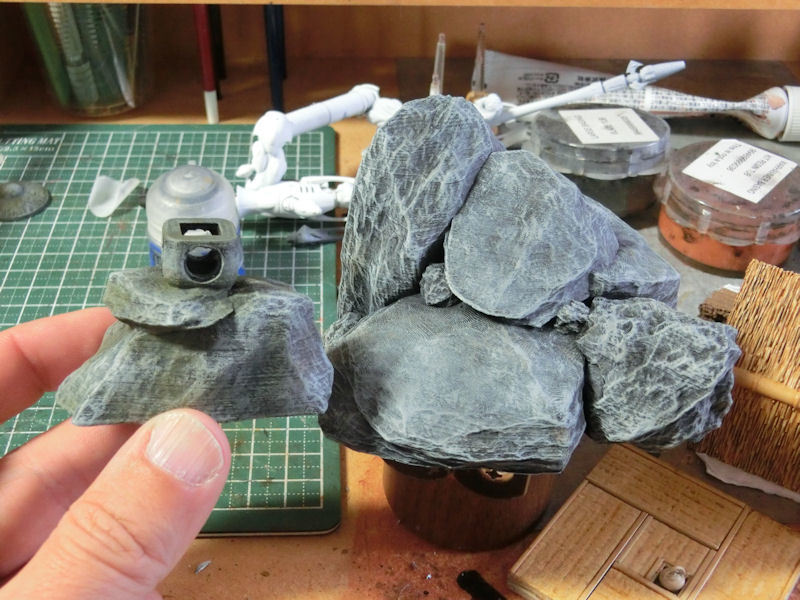
£ After a black spray undercoat, these were drybrushed with medium grey, then patches of flesh tone, then light grey.
The trick to painting rocks is to introduce patches of colour variation. After the greys were done, I lightly stippled on some khaki green in places, to show old mould. You can see the difference in the two rocks above.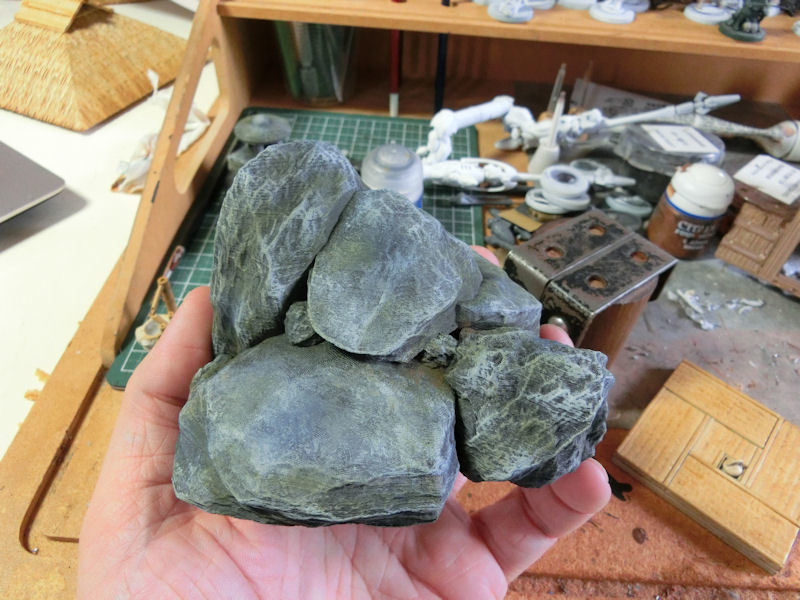
£ I then turned to my washes, with brown washes carefully smudged into crevices and then green wash added towards the bottom of rocks (where they meet the ground) and to strengthen the green of the mould patches.
£ Finally, after a quick survey on the Facebook page (thanks, everybody!), I decided to add some moss too. Some could be natural, but it's also a traditional Japanese style of gardening, to carefully cultivate moss growth on rocks.
This was, quite frankly, a pain to attach! I finally found it worked by adding a dab of white wood glue to the rock and jamming moss into the crevice. After the white glue had started to dry, I dripped some liquid glue (plastic cement) onto the moss and squeezed it down.
This is a messy job, and you have to be careful not to peel off the paint too!
£ For the rock lantern, I added in the LED bulb and a small ring of baking sheet paper to surround it, then glued on the top and some moss.
FENCES: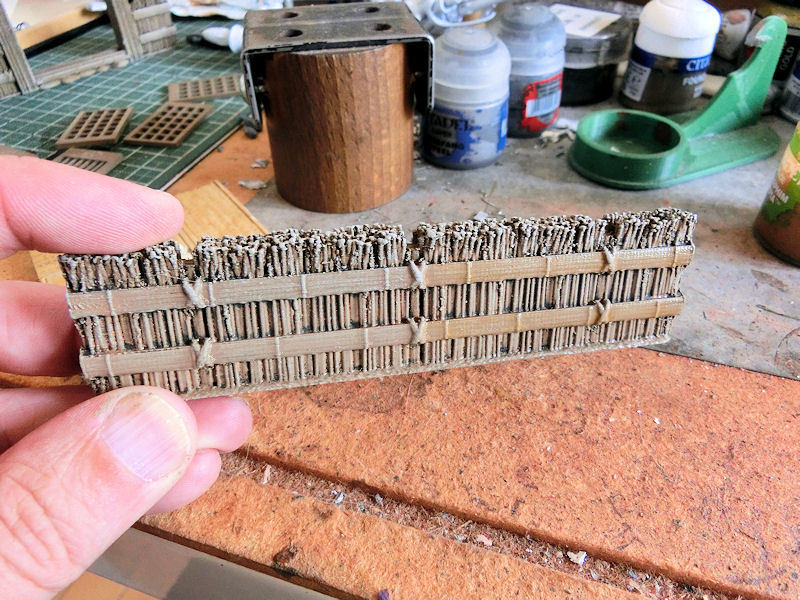
£ A light brown spray undercoat was followed by a heavy brown wash, and then a drybrush with some lighter browns and flesh tones. To differentiate the upright sticks from the long bamboo pieces, I tried a sepia wash, but as you can see from the pic above (compare left to right) ..... the difference wasn't very much.
So I tried a yellow glaze instead, and this gave it a very rich yellow finish. A little bit too bright....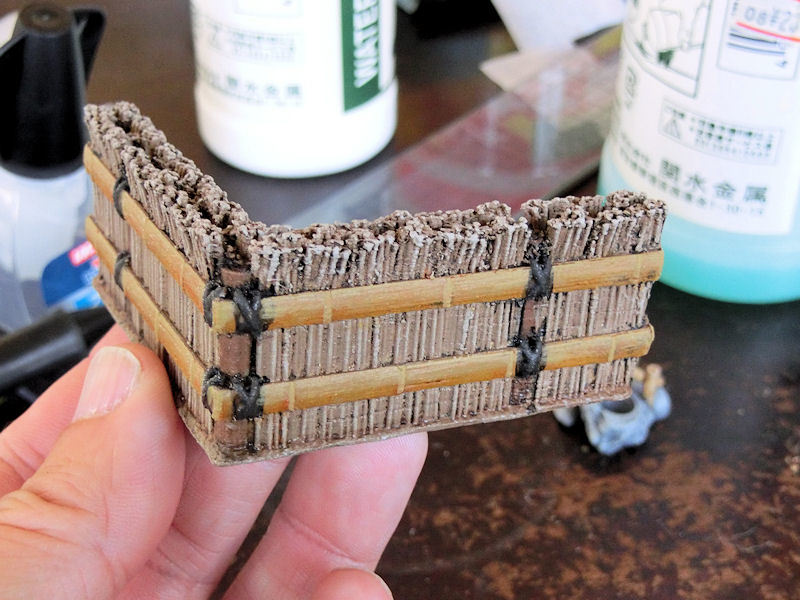
£ ... so I highlighted the top of each bamboo with some yellow brown paint. Much better!
The last job was to paint the wooden posts in a red-brown, and then the rough twine in black.
£ The gate had a few stones underneath (don't forget to add green wash for mould!), and this great thatched roof. I'll deal with how the thatch was painted in a few moments.
PATH:
£ The whole pathway was sprayed in light grey, and the gravel was basecoated in a medium grey. You could also paint the path as a mossy green surface or just plain brown dirt, if you want.
After a heavy black wash, the whole piece was drybrushed with light grey, and then patches of brown and green wash around some of the stones and edging.
THATCHED ROOF:
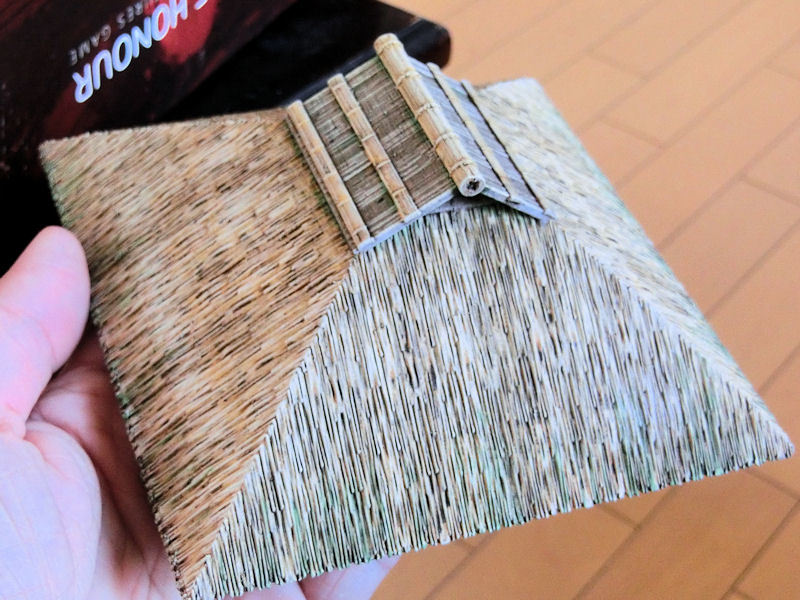
£ A cream spray undercoat is the perfect base colour to cover with a heavy sepia wash, and then a brown wash. Then it's a simple matter of drybrushing with a flesh tone, and adding in some streaks of brown wash and green wash to show weathering and mould.
The bamboo at the top I left in fairly faded colours, rather than the brighter yellows used for the fencing, so it wouldn't draw the eye too much. It's open to the sun and rain, after all!
TEAHOUSE: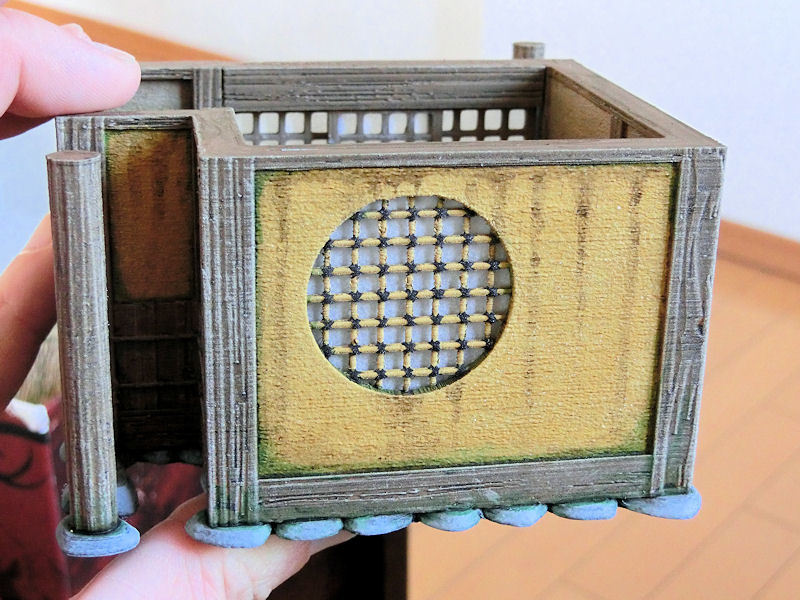
£ The teahouse has great textures already sculpted on to all of the surfaces, so I dealt with the wood first ..... a brown wash was followed by a light brown drybrush and then a flesh tone drybrush. The interior walls were a very muted light brown (so as not to distract from the tea ceremony), but I used a brighter yellow brown for the exterior walls.
The circular window is actually bamboo tied together with black twine, and the wall has a thin slot into which I inserted a folded-over (i.e. "two-ply") piece of baking sheet paper. At 28mm scale, this is a pretty good match for handmade Japanese paper, and lets light through.
TOP TIP: For the text on the scroll, try a black wash instead of black paint. It will naturally flow into the shapes of the kanji characters, and can then be neatened up easily with white at the edges.
To age the walls, I used streaks of brown wash, smudged off with my finger. This may sound a little haphazard, but it actually matches real stains quite well. Finally, I tickled green wash into the corners for mould.
WATER BOWL:
£ The rock and bamboo were painted in the same manner as described above, but a little more carefully. There's a small trickle of water connecting the two big bamboo sections, which I painted in greys and covered in gloss varnish.
The last job was to carefully add a few drips of "realistic water effect" into the bowl. I recommend doing this with a thin straw. By putting your finger over the end, you can transfer a few drops of liquid exactly where you need it.
And DONE!!!!
The teahouse set will be released tomorrow.....
We have some great new printed items to show you today - the samurai Teahouse Set!!
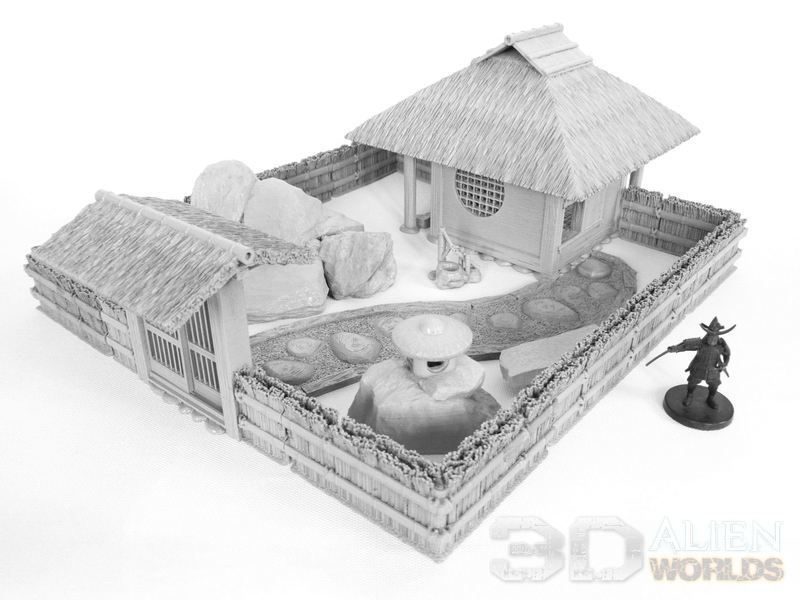
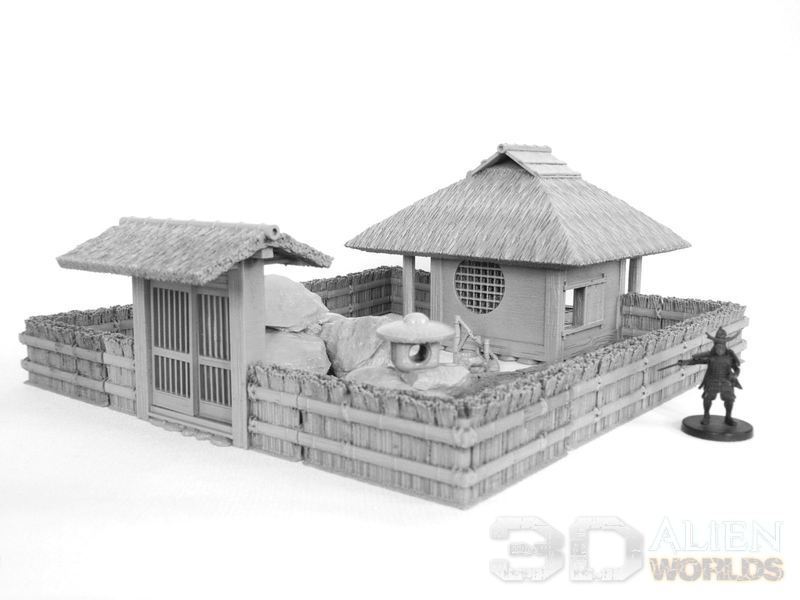
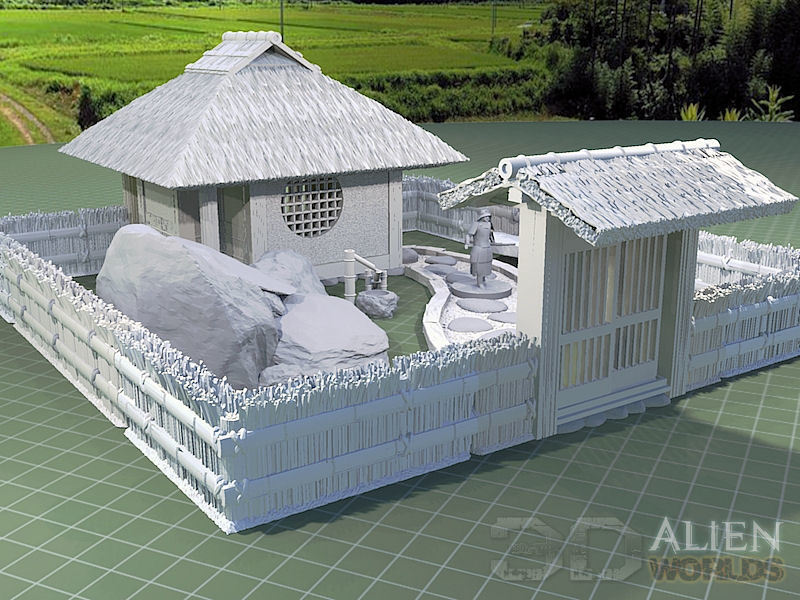
£ Here's the entirety of the teahouse set. The main components are the lovely teahouse, of course, plus a detailed rock garden and surrounding bamboo and stick fence. Lovely set, right?
So on with the printing and assembly instructions.....
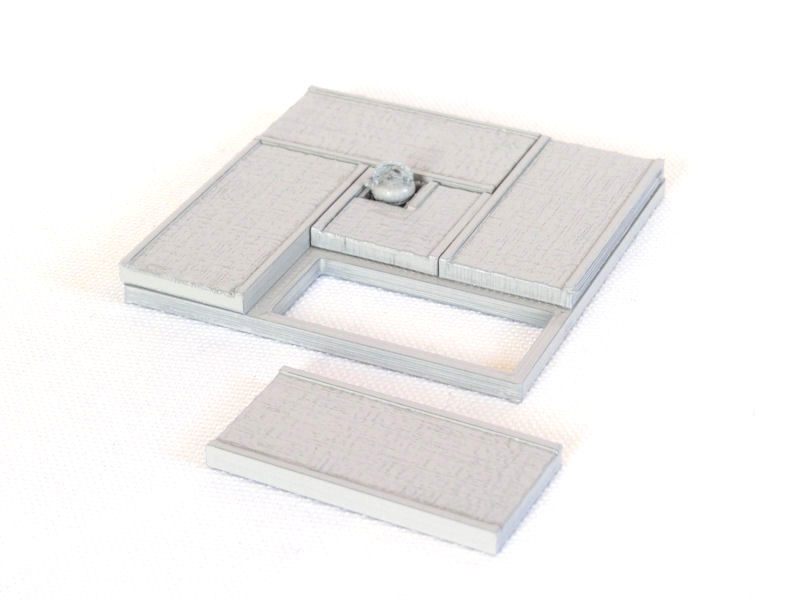
£ You start assembly with the floor of the teahouse, which is printed as several tatami mats. These are designed to be printed side-on, so that the print lines combine to form a perfect tatami texture. A central half-tatami includes a small pit for the tiny kettle.

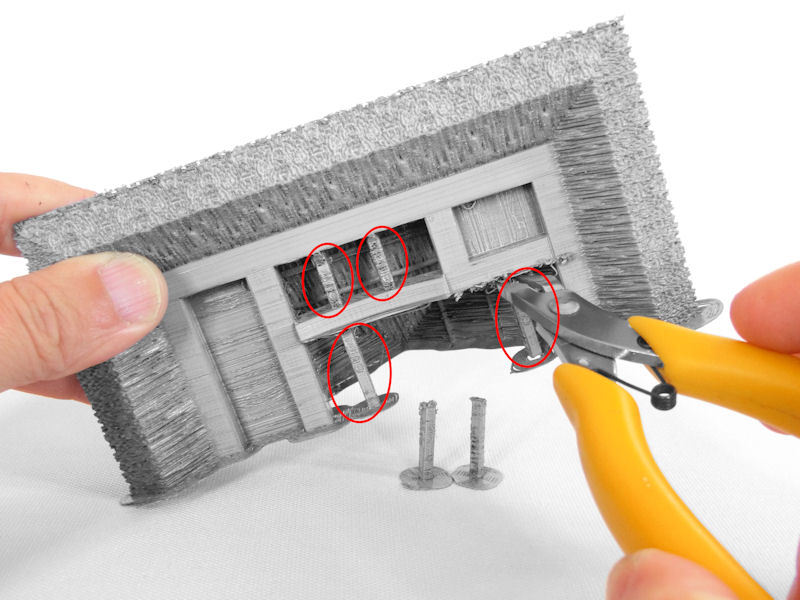
£ Next item to be printed is the teahouse itself, which is a large one-piece print. Every surface is fully textured, and only one part requires a print support. To save time, we built this print support (for the small doorway) in to the model itself, so you will need to carefully remove this piece as shown in the photo above.

£ Apologies for the rough quality of the pic above - it was hard to get a good angle for this comparison photo.
The wall section on the left was printed at 0.2mm layers, while the section on the right was printed at 0.1mm layers. We'd recommend printing at 0.1mm layers if you have the time, but the difference to the end result is not very much. Perhaps a little clarity on the scroll's kanji characters and a smoother wall?
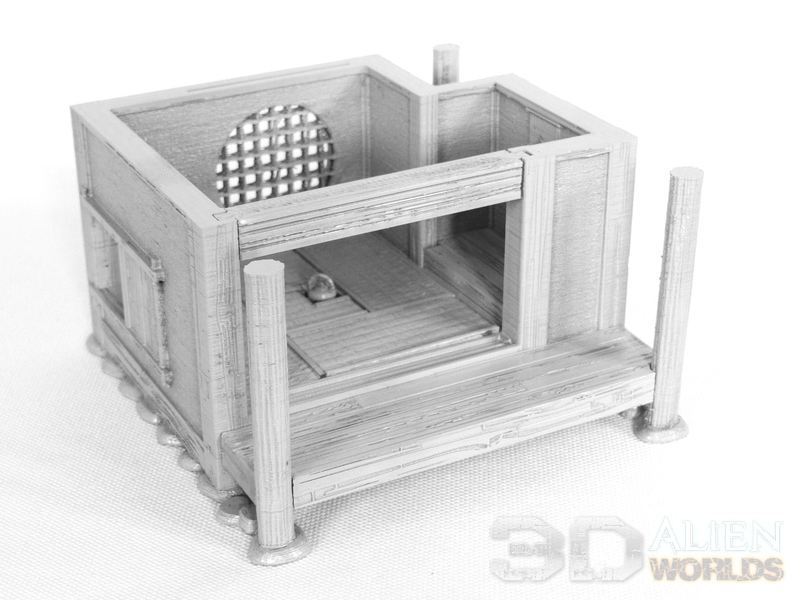
£ Once the extra balcony and tokonoma alcove floors have been printed, you can glue them in place. I'm choosing to leave the tatami floor section unglued for now, so it can be painted separately.

£ You'll notice that the wall featuring the circular window also contains a thin slot - this is designed for paper to be inserted later on.
£ The roof is printed in two halves, and has a few simple built-in supports that will need to be removed, as shown.
£ The roof overhangs the walls by quite a bit, as you'll find on real teahouses. The shape is also subtly curved, with a wood and bamboo cap.

£ The roof also provides cover for the rear balcony, which can be left open as in the photo above....
£ .... or you can insert screen doors. I chose to print these versions of the screen doors, and plan to glue thin paper to them later on.
Fences: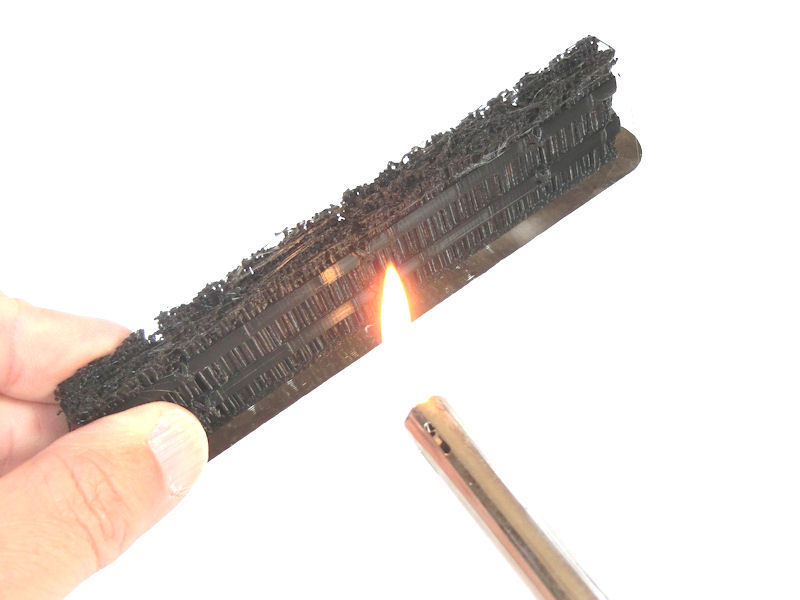
£ The fences are one-piece prints, but due to their construction they will take a while to print. You might find small webs of filament, even with retraction turned on! You can remove these by passing a flame very quickly underneath the webs. Don't melt the fence, though!
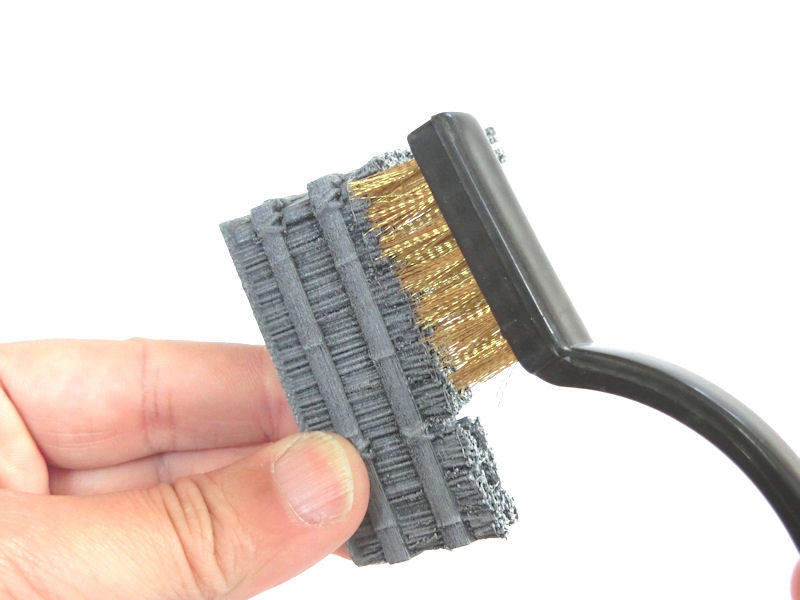
£ The other thing I find effective in preparing the fences for paint was to scrub them with a thin wire brush. This helps to remove any extra bumps or strings.

£ The fence gateway is printed in 4 pieces. The two thatch roof halves can be printed without any print supports, and there are 3 versions of the sliding gate doors.
£ All of the fence pieces include holes at either end for small 5mm magnets. It's a bit of effort to make sure all the magnet polarities match up, but I strongly recommend adding these as they clip together and hold the pieces securely during games.

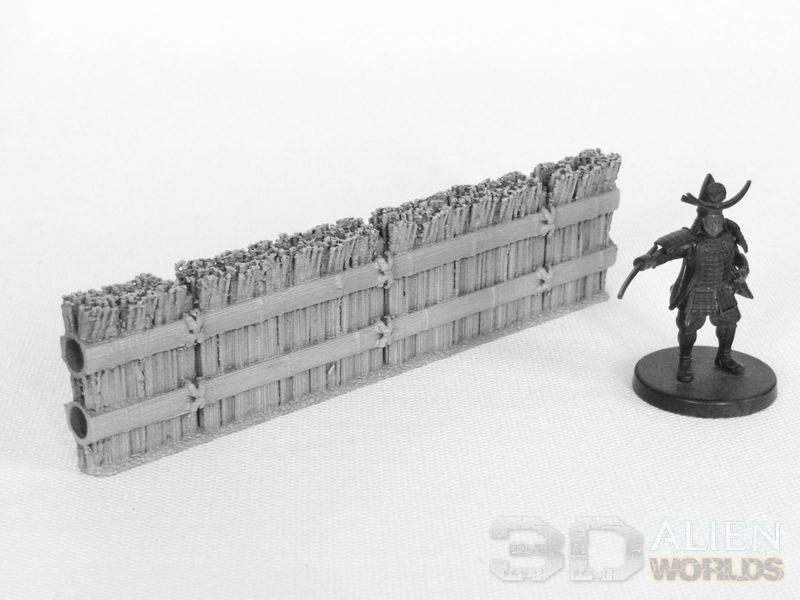
£ The fences all have wooden posts at regular intervals, which are tied to the horizontal bamboo pieces with rough twine. The sticks are then placed between the bamboo pieces to create a simple rustic fence.

£ The set includes a winding path too, leading from the gateway to the small doorway of the teahouse. The surface is textured, and you could paint this as simple brown dirt, gravel and stones, or even springy moss between the stepping stones.
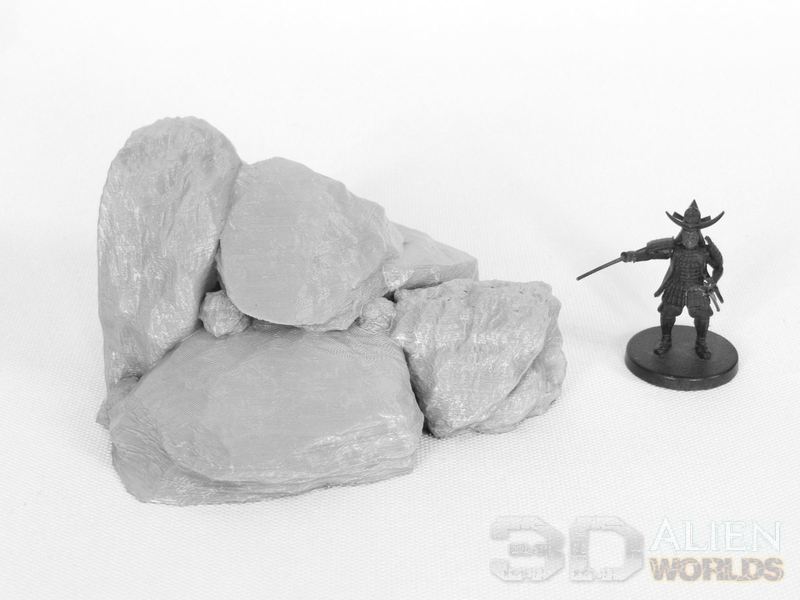
£ What small Japanese garden would be complete without a few carefully arranged rocks? This collection of rocks is a large one-piece print, and gives good sized cover for ninja assassins or besieged guests. I'm planning to add moss to mine!
£ A small stone bench for waiting guests is usually situated near the teahouse, in addition to this small water feature. You might be familiar with this piece, known as a deer-scarer in English.
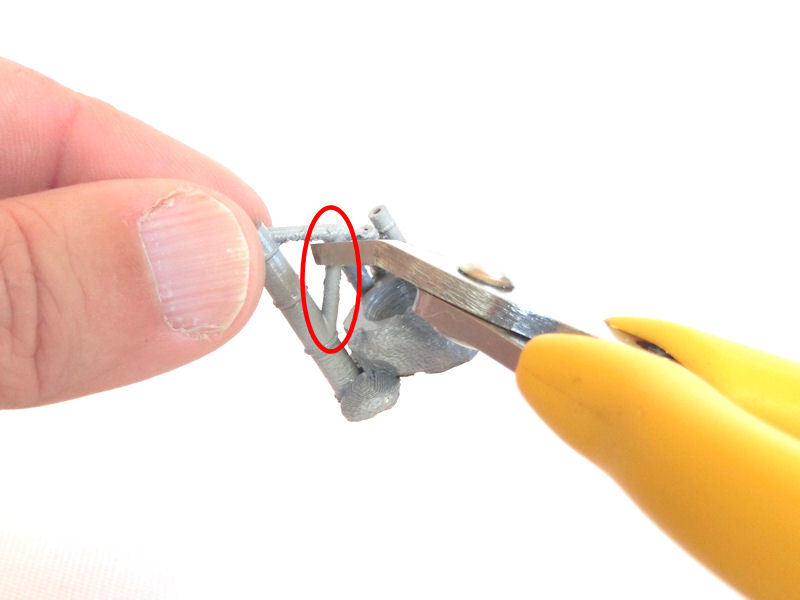
Please note that the diagonal bar circled in red in the picture above is a print support necessary for printing as one piece, and should be carefully removed with cutters.

£ I was oddly pleased that this model printed first attempt! It's very small and delicate, but adds so much to the garden atmosphere!
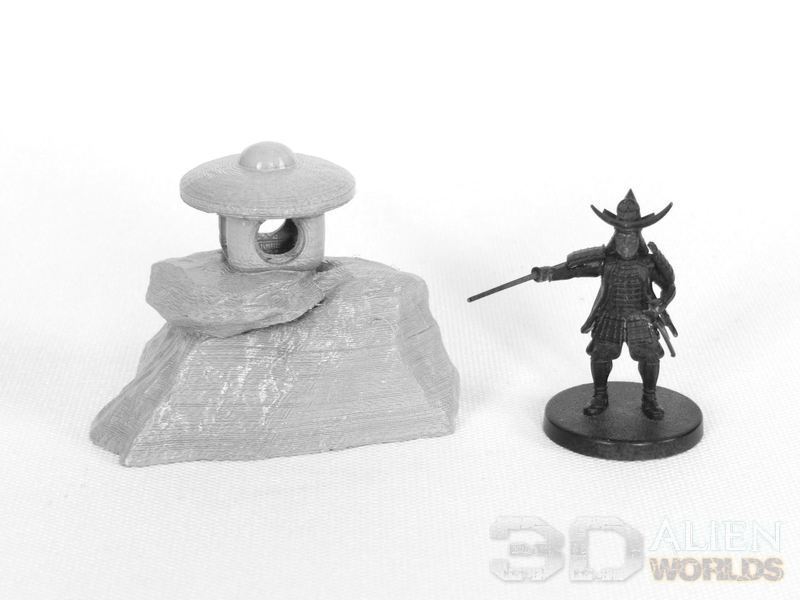
£ One last item included in the teahouse set is this stone lantern. Yesterday's blog contained simple instructions on how to wire the lantern for the LED light....
£ ... which looks like this! Cute little lighting option, don't you think?
£ This set contains quite a bit of uniquely Japanese terrain, and together makes a great diorama!
£ All the pieces are on the paint desk now, for a full release this coming week!
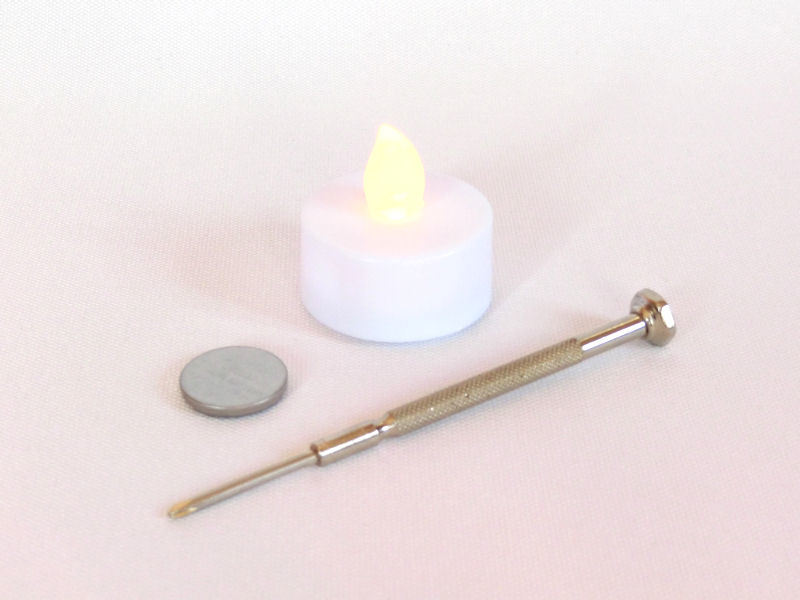
One of the accessories of the new Samurai Teahouse set is a brand new stone lantern, which can be easily wired with an LED if you want to! Well, I say "wired", which sounds a bit complicated perhaps, but this new lantern is super easy to add lighting to..... even more so than our popular wooden lantern (which required a paper clip).
What you'll need:
That's it!! Yes, really!
£ This is so super-easy, it's not really worth writing a how-to guide! But here goes...
Start by pulling apart the tealight. You may need a small screwdriver to do this, or failing that, a good sturdy dwarven axe.

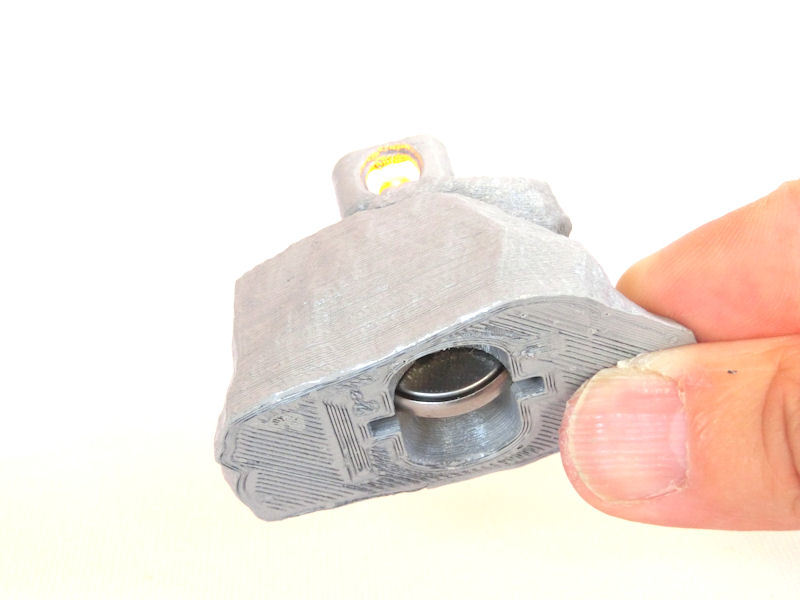
£ The only two parts you actually need are the battery (a CR2032) and the LED bulb with its two attached wires.
You can feed the rest to your pet beastie*.
* Don't do this.
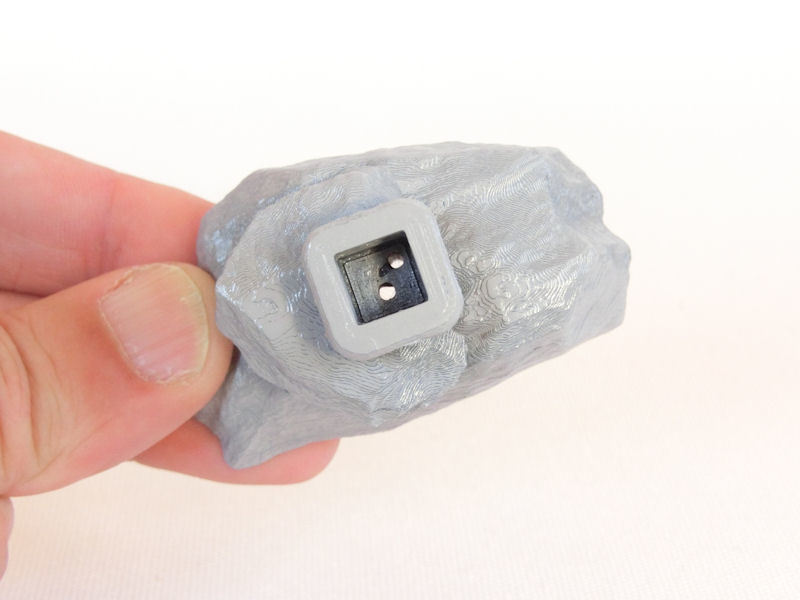
£ If you look at the top of the stone lantern model, you'll see two small holes....
£ ... simply slot the two wires from the LED into those holes. That's pretty much it!
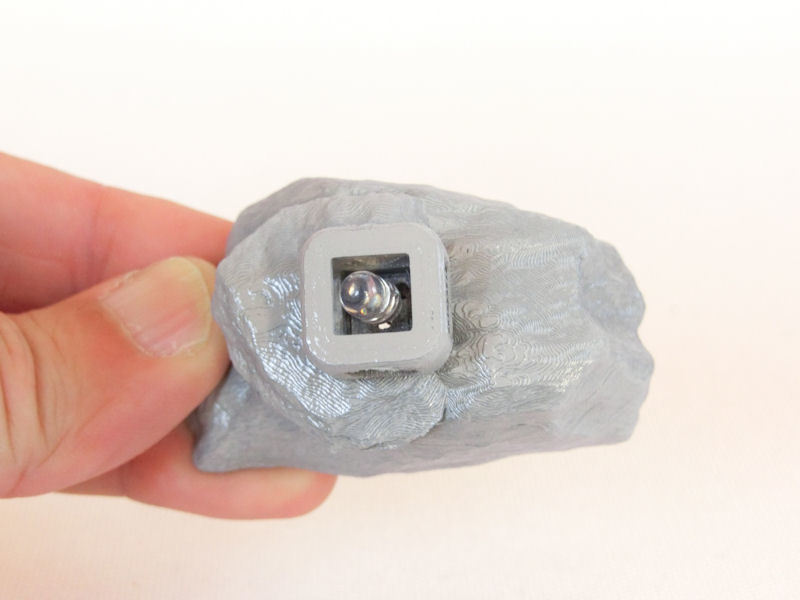
£ Okay, you might need to ensure that the two wires are roughly in the slots, looking from the bottom of the lantern. Bend them into place with a small screwdriver (or your rogue's lockpicks) if you need to.
Then simply slot the battery in the bottom. It should be a snug fit, pushing up against one wire on each side.
Note that it will probably only work one way round, so if it doesn't light up, try flipping it round in the opposite direction. You might also want to make a note of which side of the lantern is for the + side of the battery.

£ There you have it. Too easy, yes? You probably feel cheated now, right?
I'm considering adding a tiny bit of baking sheet paper inside the top of the lantern to diffuse the glow, or maybe some thin paint on the bulb, but we'll see how that looks.
Full collection of printed pics coming tomorrow, so watch this space!!
The new samurai-themed set has been a little delayed by printer problems and the recent virus-related scarcity of replacement parts, but at long last we have finished concept images to show you.....
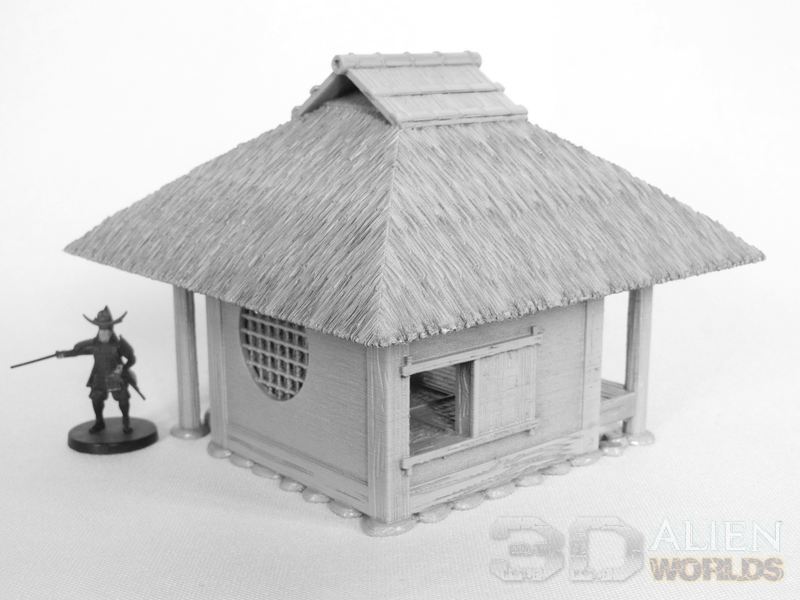
£ The bar has definitely been raised for this new teahouse set! The level of detail has been increased even further, with some very realistic textures inside and outside the house.
The set contains:
£ The fence sections are modelled after authentic bamboo and stick fences from Kyoto, tied to posts with rough twine. Straight and corner sections are included, plus a wooden gate with a thatched roof and sliding doors. Various types of gate door are included.
The garden contains a large cluster of rocks, perfect for covering in moss, plus a smaller rock feature with a stone lantern on the top. You can easily wire this lantern with an LED light, using cheap tealights - more on that in a few days!

£ The teahouse itself features a unique circular window, with can easily be fitted with paper if you want total realism. Other authentic touches include the small entrance door, kettle, and tokonoma alcove with wall scroll. The scroll has Japanese kanji characters sculpted on it.

£ At the back of the teahouse is a small balcony, which can be accessed via the sliding screen doors. Apart from the floors, the teahouse building is pretty much a one-piece print!
The last pieces of the set are currently being printed up, so we should have complete photos for you in a few days!
We have a new print partner to announce, ALT REALITY TERRAIN, from Missouri USA. They are now selling print versions of our Samurai terrain on their Etsy webstore!


4 Comments :
Charles
2020-04-29 (Wed) 13:02PM
Awesome, can't wait to paint up a set for my table and one for my friend!
Paul
2022-02-04 (Fri) 23:09PM
I was really excited when you released this design last year and am finally painting up a set printed for me by your UK partner Wonkyhead 3D printing. My friends have been very impressed with my wip photos, but it niggled me that one of them asked what the Kanji inscription was on the scroll and I was unable to answer. Might it be possible for you to let us have a romaji transliteration and a translation please? Smashing kit by the way! I'm really looking forward to getting it finished and on the table.
2022-02-04 (Fri) 23:53PM
Thanks for the comments, Paul, and glad to hear you're enjoying the kit so far. The kanji on the scroll is 和敬清寂 (わけいせいじゃく, wa kei sei jaku), and is commonly found in tea houses. According to wikipedia (because I certainly didn't know it!), the four kanjis mean "peace, respect, purity, solitude", and represent the concept that the tea master and guest will respect each other and the sanctity (?) of the tea-room. So there you go!
I'm rather glad my early research was at least accurate, even if I didn't know the message behind it! haha
Paul
2022-02-05 (Sat) 1:57AM
Much appreciated David. I spent a year in Osaka around 30 years ago, but my Japanese didn't extend much beyond shopping, restaurant ordering and chatting in bars!
Write a comment :